Monday, July 30, 2012

Crappy Day and Winner


I did NOT have a good day at work last Friday. Generally bad, but worse because it was something stupid that I did that could totally have been prevented.

As luck would have it, both girls were away with grandparents, so when I got home I headed straight for the dining room for some craft therapy, and I knew exactly which stamp set I was going to pull out.

I think this stamp set is hilarious. It's one of those sets where you see it and just have to have it.

All the papers in the card (with the exception of the red which came from the scrap bag) are from Moonlight, CTMH's new Halloween paper collection - you wouldn't have guessed that, huh?

I'm not a huge Halloween person, so I don't tend to gravitate towards the Halloween papers, but I really like this collection because it's so neutral and not so Halloweeny. This is what the full papers look like:


I definitely felt better after making this card, and having dinner out with Andrew. Hope that your day is WONDERFUL and not at all crappy. :)

Finally, the winner of the Shaping Up Blog Hop is aka Frank-Lee Speaking. Congrats Felicia! Please send me your address and I'll get your prize out to you, and thanks to everyone for participating!

Supplies Used
Paper/Cardstock: CTMH - Moonlight Papers, White Daisy bulk card base
Stamps: Unity - Crappy Day
Ink: CTMH - Cocoa
Other: CTMH - Cranberry Grosgrain, Bonding Memories Adhesive; Tombow Mono Adhesive

Saturday, July 28, 2012

Pure Happy

**For the Shaping Up Blog Hop and Giveaways please scroll down - today is the last day to leave comments!


A really CAS layout today. This is for the Moxie Fab World Hooked on Hexagons challenge as well as Pretty Little Studio's Sketch challenge.

I used my Creative Memories cutting system to cut a bunch of hexagons from GCD Studios Sweet Tooth papers. Then I created a partial grid on the page and stitched around the hexagons using my sewing machine.


There's really not too much else to say about the layout. It was simple to put together, although it takes a while to line everything up correctly and stitch around, but I like how crisp it is and how much white space there is. (It might not seem like a lot of white space to you, but it's a lot for me.)

Thanks for visiting!

Supplies Used
Paper/Cardstock: GCD Studios - Sweet Tooth Collection; CTMH - White Daisy Cardstock
Other: American Crafts - Amy Tangerine Sketchbook Glitter Foam Thickers - Scene - Taffy; Creative Memories - Custom Cutting System, Black Pen; Sewing Machine

New Stuff

**For the Shaping Up Blog Hop and Giveaways please scroll down


Sometimes I am so excited to get new goodies, that when they get here it's like I have writer's block. I kind of stare at the stuff and can't figure out where to start and what to do.

That's kind of what happened when my magical box of new CTMH stuff came yesterday. Thankfully I seem to have gotten over it.

This is just a simple card that uses one of the word bubble stamps that comes with the Cricut cartridge.


The candy stripe and chevron strips are stamps from the double stamp set that is available as a special starting August 15th called It's Your Day.


The set is so much fun and you can buy it for $5 with a $35 purchase between August 15th and September 30th. BUT, I'm going to offer a special to my readers and customers. If you purchase the Cricut Artiste Cartridge Collection set between August 15th and September 30th, I'll cover the cost of the double stamp set.

The Artiste Cartridge Collection ($99) has 700 images (you can see the handbook here) including interactive cards, three dimensional items, party favors and decorations, coordinating stamp shapes, a new font, rolled flowers, and much more. It comes with a separate booklet that provides step by step instructions for assembling the three dimensional pieces. In addition, you will receive three D size stamp sets that coordinate with the cartridge as well as three sets of coordinating dimensional elements (chipboard pieces).


Note: You need to order the cartridge directly from me so that I can apply the discount. You do need to wait until August 15th for the stamp set special to go live. If you can't wait to get the Artiste Collection and want to order it before the 15th, I will still cover the cost of the It's Your Day set when you place a $35 order between August 15th and September 30th. If you'd like to take advantage of my special offer, just shoot me an email.

Hope you have a great weekend!

Supplies Used:
Paper/Cardstock: Bazzill - Candy Shoppe Licorice Twist
Stamps: CTMH - It's Your Day, Cricut Artiste Collection Word Balloons
Ink: CTMH - Black
Other: CTMH - Bonding Memories Adhesive, Dimensional Foam Tape

Thursday, July 26, 2012

In Pursuit of Eggs - Embellishing and toning down patterned paper

**For the Shaping Up Blog Hop/Giveaways please scroll down


I finally printed out our Easter photos and am starting to scrapbook them.

For this layout I chose this beautiful sheet of paper from Basic Grey's Konnichiwa collection. It's a busier pattern than I am used to using, but it just seemed so perfect. In order to tone it town a little so that it wasn't competing so much with the photos, I incorporated some doilies.

I'm using two sizes here, the large ones are more of the ones that I got from that conference I attended back in April (they were under the candies that were on all the tables). The smaller ones are from Curtsey Boutique. I ended up laying a smaller one on top of each of the larger ones. It adds some extra texture and also further softens the color.


I was almost ready to just leave the layout as is, but I thought it needed a little something. I didn't want to overload it with embellishments, so I ended up adding interest by randomly adding Liquid Glass to some of the little red berries. Creates some shine as well as texture.


For the little embellishment cluster, I pulled a couple crocheted flowers from my stash, layered some of the collection stickers on top, and added a dot of Liquid glass in the center as another accent.


Can you believe that there is NO cardstock on this layout! This is a first!

I'm going to be linking this up with the following:
1) May Flaum Camp Scrap - Doilies
2) Basic Grey July Flickr Challenge
3) CK Summer Camp Altered Sticker Challenge

Supplies Used
Paper: Basic Grey - Konnichiwa
Other: Basic Grey - Konnichiwa letter stickers; CTMH - Liquid Glass, Crocheted Flowers, Bonding Memories Adhesive; Tombow Mono Adhesive; Curtsey Boutique - Round Paper Doilies; Doilies from stash; CM - Photo Splits, Black pen

Tuesday, July 24, 2012

Birthday Girl for PDCC141 and Verve Diva Dare

**For the Shaping Up Blog Hop/Giveaway post please scroll down.


I've been playing with squares of paper.

I really love the quilted trend, and I love cutting or punching a bunch of squares and playing with them until I get a design I like. That's what happened here.

It's a pretty simple design. I tacked the squares down with repositionable adhesive, and then stitched across. I'm not particularly picky about my stitching, I think a wonky stitch is often more fun than very neat, straight stitching.


Andrew often says that I get too tied to an idea/design and the sentiment/purpose of the card is an afterthought. It's often kind of true, and I admit that it's the case here. Since the Verve Divas are daring us to make birthday projects this month, I thought I would go with that theme.

Hope that your week is going well. My new CTMH goodies arrive tomorrow (including the new Cricut Cartridge!), so I'm looking forward to some serious crafting this week.

Supplies Used

Paper/Cardstock: Crate Paper - Pretty Party 6x6 Pad; Jillibean Soup - Homemade 6 Bean Soup 6x6 Pad; CTMH - Colonial White and Buttercup cardstock
Stamps - Little Inker Designs - Sentimental Flags Additions Stamp Set
Ink - CTMH - Tulip
Other: LID - Sentiment Flags Additions Dies; Scrapbook Adhesives - Repositionable EZ Dots Mini; Tombow - Mono Adhesive; Sewing Machine

Monday, July 23, 2012

Shaping Up Blog Hop and Giveaways


Welcome! I was one of the Top 20 girls in the Paper Crafts Magazine Gallery Idol 2012 Contest. One of the other girls, Laurie, created a Facebook group for us to meet and chat. http://www.blogger.com/img/blank.gif

We had so much fun and wanted to do something together to say thank you to Paper Crafts Magazine and the craft community for supporting us during the competition. We know many of you are participating in the Paper Crafts July Gallery Challenge, so we put together this blog hop to provide each other, and you, with some inspiration. You should have arrived here from Jocelyn's site.

Each of us is also offering up a little giveaway. Here's what you can win from me:


All you need to do is leave a comment.

AND if you are participating in PC's challenge too, please leave a link to your card below. We'd love to be able to come by and take a look! (Please only link up cards created after July 9th - you only need to link up on one blog, we'll all be able to see the cards, and some of the girls are offering some extra giveaways to linker uppers.)

So here's my card. The PC challenge was to create a summer themed shaped card. Nothing says summer to me more than Slurpees!


It was harder than I thought to execute this card. For the Slurpee cap, I used a page protector, but those are kind of flimsy, so I had to find a way to stiffen it up. I just KNEW that the laminating machine I bought last Christmas would come in handy! The top part of the cap is laminated. The bottom part, that attaches to the cup is a 1/2" strip of the page protector. It's folded in half lengthwise and then sent through my paper crimper. The straw is a piece of Gypsy cardstock wrapped with some purple cellophane wrapping paper.


I'm trying to keep this short as it's a relatively long hop, so if you have any other questions about the card, please ask.

You have until July 29th to leave comments, and winners will be announced July 30th.

Your next stop is Anita, but the full hop order is listed below in case you get turned around:

JJ Bolton
http://rgcards.blogspot.com/

Heather Campbell
http://parkermolly.blogspot.com/

Joscelyne Cutchens
http://www.cutchens.com/

Jennifer Ingle
http://justjingle.blogspot.com/

Amy Kolling
http://stamp-n-paradise.blogspot.com/

Agnieszka Malyszek
http://justmadefrompaper.blogspot.com/

Wida Miller
http://beachorado.blogspot.com/

Jocelyn Olson
http://redballooncards.blogspot.com/

Miriam Prantner
http://mprantner.blogspot.com/

Anita Recksiedler
http://craftygrldesigns.blogspot.com/

Elena Roussakis
http://justmeprints.blogspot.ca/

Erin Lee Schreiner
http://www.erinleecreative.com/

Dana Warren
www.kraftpaperstamps.blogspot.com/

Laurie Willison
http://soapboxcreations.blogspot.com/

Tessa Wise
http://www.craftygrl.blogspot.com/

Nina Yang
http://waffleflower.com/


Supplies Used

Paper/Cardstock: Pink Paislee - Hometown Summer paper; CTMH - White Daisy, Holiday Red, and Gypsy cardstock
Stamps: CTMH - Enjoy Life
Ink: Black, Holiday Red
Other: CTMH - Sponge Dauber, Memory Protector; EP - Season's Greetings Stickers; Paper Crimper; Tombow - Mono Adhesive and Vellum Mono Adhesive; Scotch - Thermal Laminator; Purple Cellophane wrapping paper

Sunday, July 22, 2012

The LAST 2011 Christmas Layout


This is it! I've officially finished all the Christmas layouts from last year, it truly is Christmas in July!

This was from our outing to the National Zoo a couple days before Christmas. In the evenings, they light up the zoo, it really looks pretty amazing, and they have some additional activities too, like ice skating (on a fake ice surface), a little train, stuff like that.

Carina's favorite thing? A guy dressed in a panda suit dancing in an air-inflated snow globe. Yup. She would have stayed there all night, but Panda Man had to take a break, and we took the opportunity to pry her away from the snow globe.

Anyway, I'm using Echo Park's Season's Greetings Collection. I used a busier paper, and to tone it down and kind of frame the photos, I used some of CTMH's Create-a-Shade Pearl Paint. I've seen people do that with regular paint, what I hadn't really figured on is how translucent the Create-a-Shade is (this was my first time using it). So it really added more shine, than toning down the paper. It's hard to see on the photo of the entire layout because of the reflection of the camera's flash, but you can get a better idea from the detailed photos.


I was going to use my sewing machine to stitch frames around the photos with black thread, but I can't for the life of me find my black thread. Plan B was to create a frame around the whole page using thin strips of DCWV Textured Adhesive cardstock. Then I used cream thread to stitch down two adjacent sides of the photos (I can't believe I finally stitched on photos....part of me finds it kind of sacriligious, but I'm glad I finally bit the bullet and did it).


Most of the embellishments came from the Season's Greeting Collection pack, although I did add some Cranberry grosgrain and Glitter Chipboard Thickers.


I do like the way it turned out, and I'm so, so, happy to have crossed Christmas 2011 off my list of things to scrapbook!

I'm going to enter this into Two Peas' Christmas in July CHA Challenge - today's the last day to enter projects, so get busy!

Supplies Used
Paper/Cardstock: EP - Season's Greetings papers; DCWV - Textured Adhesive Cardstock
Other: EP - Season's Greetings Collection Pack stickers; CTMH - Create-a-Shade Pearl Paint, Cranberry Grosgrain Ribbon, Helmar - Quick Fix Permanent Adhesive Runner; Tombow mono adhesive runner; American Crafts - Red Reindeer Glitter Thickers; Sewing Machine; Pigma Black Micron Pen

Friday, July 20, 2012

Matching Game Layout


This is another one of those layouts where I ended up with a gazillion collections, kits, and embellishments all over the the floor in the family room while I picked and chose from them. I'm also continuing to get comfortable with mixing and matching patterns and collections, in fact, there is almost no plain cardstock on this layout!

This one is also for a bunch of challenges:
1) Elle's Studio - Show me your tapes
2) Scrapbook Circle - Sketch challenge
3) Two Peas CHA Summer Social Challenge #9 - Put it in a pocket
4) Paper Issues - Wishy Washi theme

I love these photos and wanted to get them scrapped. They are from this past March. Ellie had closeted herself in the master bathroom (so Carina wouldn't bother her) and came out with her own matching game! I have no idea what possessed her to create her own game, but I was so impressed. Her matching pieces actually match, and it was so touching to see how proud she was of what she had created.

The pocket is kind of hidden. I used a glassine envelope that I got from the Curtsey Boutique Etsy store. I dressed it up with a little washi tape from Target, and then attached it to the page using that fun cloud/heart washi that came in a Polka Dot Whimsy kit. Since the little pocket is so full, I ended up needing three layers of dimensional foam tape for the photo on the left.


There are a variety of papers from CTMH, Bella Blvd, and GCD as well as a bunch of Elle's Studio tags (the blue chevron ones on the left side of the page are actually the same one, I just cut it in half so I could get a little more mileage out of it). The bracket and flower pieces are actually stickers (one is Crate and the other is Bella Blvd). I cut small circles to go in the centers because the Crate one was more of an off white color, and there was actually some writing in the center of the Bella flower that I didn't want to use.


It's a busier layout than I normally do, lots more elements, but I think it works. Thanks for coming by, hope you are enjoying your weekend!

Supplies Used
Paper/Cardstock: CTMH - Dotty for You and Cruisin papers, White Daisy cardstock; Bella Blvd - Flirty; GCD - Sweet Tooth
Other: CTMH - Dimenstional Foam Tape; Elle's Studio - Lil Snippets, Turquoise Pennants, blank pennants; American Crafts - Black Custard Thickers; Crate - Random collection Phrase Stickers; Bella Blvd - Winter wonderland sticker; Curtsey Boutique - Glassine Envelope; Target - Washi Tape (pink stripe); Polka Dot Whimsy - Cloud/Heart washi; CM - Photo Splits; Tombow - Mono Adhesive; Pigma Black Micron Pen

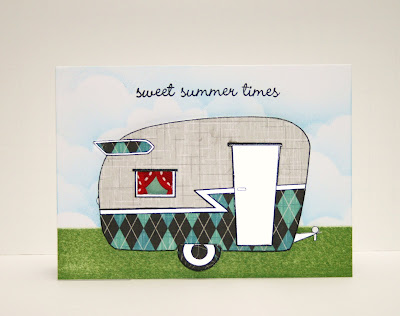
Cruisin with Market Street Stamps Camper Digi


I just realized I have been a BAD blogger this week. It's been busy, and I actually have several projects going on simultaneously, but I did want to share this card with you today. This is the card I wanted to create last month for the Market Street Stamps block party, but my printer was on the fritz.

I'm using CTMH's Cruisin papers, which are retiring this month, so if you want them, better hurry and get them. I used some more of my retired CM metallic paper for the base, and then pieced the patterned papers on top.

The curtains are some red piped grosgrain from Michael's, and I used a little scrap of old Bliss paper for the inside of the camper.


Some sponged clouds and sanded Topiary cardstock for grass complete the look.

One more thing, I wanted to let you know that I'll be participating in a special blog hop on Monday with some of my fellow Gallery Idol ladies. We've gotten to know each other quite well, and thought it would be fun to all play along with the current gallery challenge at Paper Crafts which is shaped cards. So, be sure and come back on Monday. There will be prizes galore!

Supplies Used
Paper/Cardstock: CTMH - Cruisin papers, White Daisy and Topiary cardstock; CM - Silver Mettalic Paper
Stamps: MSS - Camper digi; CTMH - Summer Days
Ink: CTMH - Black, Dutch Blue
Other: CTMH - Dimensional Foam Tape, Sponge Tool; Helmar - Quick Fix Permanent Adhesive Runner; Tombow mono adhesive runner; Red grosgrain ribbon from Michael's; 3L - Small Dodz adhesives

Tuesday, July 17, 2012

Giveaway Winner(s)

My new Close to My Heart Idea Books arrived today!

The winner of the Card Creations/Idea Book giveaway is: Krissy!

And, since I'm so excited about the new book, I drew a few more winners for the Idea Book: Chan and Angi.

If you ladies would please send me your address I'll get these right out to you.

AND, if you didn't win, but would still like an Idea Book, please email me. I just need $5 to cover the cost of shipping, but you will receive a $5 credit on your first order.

Have a great night!

Monday, July 16, 2012

Hello card for Moxie Fab World


I really love the stamp set that comes with the Pemberley workshop on the go. The images are vintage, yet modern/retro. I'm not exactly sure what this stamp is supposed to be, but that's part of the appeal. I've seen it used as a leaf, as the wing of a bird, and here I'm using it as a flower petal.

I stamped it 15 times and then cut out the petals to create three flowers. I think that black, white, and yellow is such a fun color combination and this Oh Happy Grey paper from Amy Tangerine was perfect. I orginally had the flowers directly on the background paper, but the flowers didn't seem anchored enough, so I added a few punched cardstock circles as a base and some bling in the center.

The trim is from Hydrangea Hippo. Again, I really wanted it to stand out, so I (very carefully) glued it to a thin strip of white cardstock, and then cut around the scallops and added a little more sparkle to it.

The 'hello' is from Hero Arts Hooray set.

What do you think? I'm also going to link this up to Virginia Lu's How to Stretch Your stamp series, which is well worth the read if you haven't gone through it yet.

Thanks for stopping by! Hope you week is off to a good start!

Supplies Used
Paper/Cardstock: AC- Amy Tangerine Oh Happy Grey paper: CTMH - Black, White Daisy, and Honey cardstock
Stamps: CTMH - Pemberley workshop on the go set; HA - Hooray
Ink: CTMH - Black
Other: Little Yellow Bicycle - Hello Spring Jewel stickers; Hydrangea Hippo black crochet trim; Helmar - 450 Quick Dry Adhesive; Tombow adhesive

Saturday, July 14, 2012

Dream Come True Layout


This is not my average layout. First of all, it's only got one, count it, ONE photo. Second, it's not about documenting an event, it's about documenting where I was at a given point in time.

I'm a member (a bad member as I don't participate nearly as much as I would like) of a Scrapbooking Your Faith group that Courtney Walsh set up. This layout is in response to one of the recent prompts which was to Scrap/Document a time that tested you.

The other challenge that I had for myself was to really mix up my products for this layout (another one of the challenges from Shannon Tidwell's Sassy Scrapping class, of which I am also a bad member). It was actually a lot of to pick and choose pieces from everywhere...there is a whole mish mash of stuff on this layout, but I really like how it all came together.

I started with a single 6x6 sheet from Basic Grey's Paper Cottage line, and went from there. It's funny because I was determined to use that scrap of Stella and that bit of Bella Blvd since I love those papers, but they don't necessarily go together, and the Simple Stories strips I used to frame the top and bottom of the page would intuitively have been what I pulled out if I was planning the page out more, but this is how things just came together. It really was kind of by the seat of my pants. I had planned to use a different set of alphas, but lo and behold, Pink Paislee's Declaration collection came in the mail (THANK YOU PINK PAISLEE!) and they were perfect.

So back to the story of the layout itself. That photo is of Ellie when she was one month old. I can still remember taking the photo. One month is a big deal for Chinese babies. You're supposed to stay in the house until one month (except for going to doctor appointments), and then there's a big party when the baby is a month old. People are invited, gifts are given, baby is introduced, etc. But, since most of the people who would be invited to such a party don't live near us, we just had a little celebration at home. My mom, who was with us at the time, got some really good, authentic Chinese food and we dressed Ellie up in an outfit my sister had sent.

I remember taking the photos and feeling like I should have been excited and happy and really celebrating, but all I wanted to do was go to sleep. And actually, in the first couple of months I had an enormous sense of guilt that I wasn't enjoying being a mom. OF COURSE I loved Ellie, and I had dreamed of and wanted to be and had been so excited about becoming a mother, but the reality was somehow so different.

It's not that I thought it would be easy, I knew it would be hard, but Ellie was a really difficult baby. She had reflux so she was a terrible nurser, eating just enough to not be hungry and wanting to eat again an hour and a half later. Physically, it was a much harder road back as well - I had some thyroid issues and was exhausted all the time. Life for those few months was just about survival.

So the journaling tells that story and about how I really had to cling to God, and his promises during that time. I started memorizing passages of scripture when I was up with Ellie, and it became part of our night time routine that I would recite them to her at bedtime (we still do this). She's almost five now, and I realized about two years ago, that she knows the passages and can say them with me. How cool is that, right? I'm praying that these will stick with her always and someday she'll be able to claim them when she is tested.

Hope you have a wonderful weekend! It's a busy one here, but all fun things.

Supplies Used
Paper/Cardstock: Simple Stories - Yearography; Basic Grey - Paper Cottage 6x6 pad; CTMH - Stella paper and Pacifica cardstock; Bella Blvd - Plastino ; Sassafras - Sweetly Smitten; Crate Paper - Storyteller
Other: Elle's Studio - Pink Pennants; Express the Moment - Stamped Tag; May Arts - White Twine; CTMH - Cork Shapes; Studio Calico - Wooden heart; Pink Paislee - Declaration alphabet stickers; Sewing Machine; Tombow Adhesive; Helmar Quick Dry Adhesive

Thursday, July 12, 2012

Little Giveaway


It hasn't been that long since the last giveaway, but I just got my Gallery Idol prize pack, so I have an extra copy of Card Creations to share with one of you.

I'm also going to throw a few 'flat' goodies in with it, and (if you don't already have one coming your way) I will include a copy of the NEW Close to My Heart catalog.


The catalog JUST went live for consultants and I'm so excited about it! Here are a few highlights:

1) A new Cricut cartridge! The Artiste cartridge is packed full of 700 elements including interactive cards, 3-D items, party elements (think cupcake liners and favors) and also comes with three sets of dimensional elements (my favorites are the word bubbles) and three D sized stamp sets (which include big word bubble stamps).
2) The return of bulk cardstock packs in all colors ($14.95 for a pack of 24).
3) Alcohol markers.
4) Lots of new items to decorate including a Christmas Countdown box, 3x3 cube, canvas journal, frame, etc.
5) New embellishments including burlap ribbon, canvas shapes, and chalkboard shapes.
6) Six new colors (there are a bunch that are retiring).
7) Mini inkpad towers (10 for $19.95).
8) LOTS of great new stamps and papers.

So here's the deal. If you'd like to receive Card Creations, just leave me a comment (let me know if you want a copy of the CTMH catalog when you do so). I'll draw a winner when I receive my hard copy catalogs (they are supposed to ship today). Good luck and hope you are staying cool!

Peace, Joy, and Comfort Food (Be Inspired!)


This Christmas in July card is for The Alley Way Stamps Be Inspired challenge. Here's the inspiration picture.


I used two TAWS stamp sets: Christmas Magic and Kitchen Gadgets 2.

Christmas Magic is a sentiment set that has lots of holiday related words. 'Food' is not part of the set. I used the old masking tape trick and took the 'f' and 'o's from the word 'comfort' and the 'd' from the word 'child'. The d is a little smaller than the rest of the letters, but it was the closest size and I don't think you notice unless you know, and of course I went and told you....

I'm going to link this one up over at Kim Kesti's blog too since I used something new (the Christmas Magic set) as well as some papers I founds when I was going through the archives. The red star paper is from a little 5x7 stack that I THINK might be DCWV, but it's missing the cover (go figure), and the silver metallic paper is Creative Memories.

Hope that your week is going well! I've been busy following all the goings on at the CTMH convention. There's some exciting stuff coming, so stay tuned!

Supplies Used
Paper/Cardstock: Creative Memories - Silver paper; CTMH - Believe Level 2 Papers (blue star), White Daisy Cardstock; Misc - Red Star paper
Stamps: TAWS - Christmas Magic, Kitchen Gadgets 2
Ink: CTMH - Holiday Red and Black
Other: CTMH - Bonding Memories Adhesive, Craft knife; 3L - Small Dodz adhesive; Tombow adhesive; Tim Holtz Tiny Attacher

Tuesday, July 10, 2012

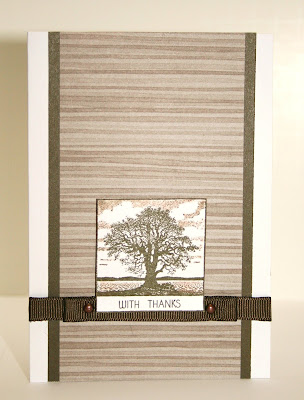
Card for Kim Kesti's Crafty Month Challenge and Moxie Fab World


Last month was 'Crafty Month' over at Kim Kesti's blog. She issued a challenge to her readers to create a project using something old (at least a year) and something new.

Since I've only been stamping/creating cards for about a year, I don't have a ton of 'old' in the stamping arena, but I have scrapbooked for a long time, so I have lots of old papers.

That great neutral print is from an old Creative Memories Storybox called Metro.

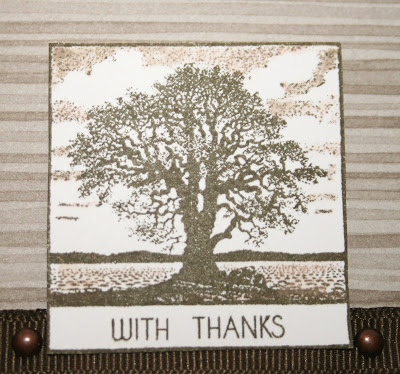
I've paired it with a brand spankin' new Hero Arts stamp that I just won as blog candy from Simon Says Stamp. The set it comes from is called I Love Books.

The stamp actually looks like this when stamped


I cut off the top, added the 'With Thanks' from CTMH's Card Word Puzzle stamp set, and then used my blending pen to define the clouds/sky a bit more.


I'm also going to link this up over at Moxie Fab World's Stamp It Thank You card challenge.

Hope your week is going well. Thanks for stopping by!

Supplies Used
Paper/Cardstock: Creative Memories Metro Storybox; CTMH - White Daisy and Cocoa cardstock
Stamps: Hero Arts - I Love Books; CTMH - Card Word Puzzle
Ink: Cocoa
Other: CTMH - Cocoa Grosgrain ribbon, Antique Copper brads, Dimensional Foam Tape, Blending Pen; Tombow adhesive

Sunday, July 8, 2012

Just for you for Young Crafters Unite Many Layers challenge


I actually created this card before I knew about the lastest YCU challenge. Love it when that happens!


I'm using Jane's Doodles new Doodle Flowers stamp set which just came in the mail this week. I was the fortunate winner of the last release and this set is the first to get inked up.

It's funny because I've started about four projects since I got home from vacation, but I guess my creative mojo went on vacation too, so this is the first project that I've liked enough to finish. I even stayed up late to finish it.

I stamped the flower four times. Three times on different Amy Tangerine Sketchbook papers (bottom layer and the top two layers. The second layer was stamped on white cardstock and then I used my craft knife to cut out the middle portion of the petals. Then I colored the outer portion in with a Spectrum Noir CT2 marker.

I used large Dodz adhesives to adhere the second and third layers of the flower to the pink base. I love how well those adhere and it's a little thinner than my foam tape. The top (yellow) piece of the flower was too small to use the big Dodz, so I layered three of the small Dodz pieces together to get enough height. Then I added a pink gem on top.

The petals are also Amy Tangerine, but I used the 6x6 pad for those, and I wove a bit of Amy Tangerine grosgrain around the sentiment on the card to finish it off.


Love how it turned out, and hoping that this card was just what I needed to get back in the swing of things.

Thanks for coming by....first day of work after two weeks tomorrow!

Supplies Used
Paper/Cardstock: Amy Tangerine Sketchbook; CTMH - White Daisy cardstock; White Daisy Bulk Card Base
Stamps: Jane's Doodles - Doodle Flowers
Ink: CTMH - Black
Other: 3L Dodz large and small adhesive; American Crafts Amy Tangerine Sketchbook grosgrain ribbon; Little Yellow Bicycle Hello Spring Jewel Sticker; CTMH - Bonding Memories Adhesive, Craft Knife

Saturday, July 7, 2012

Vacation Stamp Carving Results


As I mentioned before we left on vacation, I took some stamp carving supplies along on vacation with us. You can see the little kit I took above: ink, carving tool, mechanical pencil, ballpoint pen, Sharpie marker, and Speedball carving material. I precut the pieces before I left taking a bunch of 1" square pieces and a few 2" x 3" pieces.

I worked through lessons 1-3 of Stamp Carving 101, and also created some extra images.

Lesson 1: Heart


I wasn't that happy about my first attempt (second from left), so I did it twice. Then I created a couple extra images using the same technique. I'm most excited about the @ symbol - I think that stamp will get a lot of use in my layouts.

Lesson 2: Stripes Set


Lesson 3: Contained Chevron


I also created some stamps. The first three I'm planning to use for borders/backgrounds, and the little arrow is going to be another really useful one for layouts.


It was nice to be able to still do some creating on vacation, this class is so much fun and I can't wait to work on the next lesson!

Hope you had a good end to your week and are staying cool!

Thursday, July 5, 2012

Back from Vacation


It's always nice to get away, but even nicer to get back home. And so wonderful to be reunited with the girls.

Thanks so much for all your visits while I was away. I'm busy digging out from being away for a week and a half. Lots of laundry, errands, not to mention serious cleaning and restocking of the fridge as the power was out for about three days while I was gone.

I'm hoping to get busy crafting this weekend, but until then I thought I would share a few photos from our trip.


At Fisherman's Bastion in Budapest


Roman ruins at Aquincum outside Budapest


Bran Castle, Romania


View of Sibiu square, Romania