Friday, November 30, 2012

Jane's Doodle's Father's Day Card


Still kind of under a mountain of Christmas cards/DT assignments, but I thought I would pop in quickly to share a card I made a while back that wasn't picked up.

This was kind of a fun technique.  I first stamped the chevron border on the kraft cardstock in White Daisy pigment ink.  While it was still wet, I used an old dry baby wipe to lightly brush the surface.  This kind of softens the color and spreads a little ink over the entire surface.  Then I went back (again not waiting for the ink to fully dry) and stamped again using Outdoor Denim ink, but stamped it slightly offset from the original stamps.  This ends up creating multiple shades of blue since the portions that are stamped over the original pigment ink turn out lighter.


The background is kind of the star of the card, so I kept the rest pretty simple.  Just some twine and buttons.

Hope that you had a good end to your week!

Supplies Used
Paper/Cardstock:  CTMH - Kraft and Outdoor Denim Cardstock
Stamps:  Jane's Doodles - Patterns for Him, Just Dad
Ink:  CTMH - White Daisy and Outdoor Denim
Other:  CTMH - Kraft buttons; May Arts - Twine; Tombow - Mono Adhesive; 3L - Small Dodz Adhesive

Wednesday, November 28, 2012

Last challenge post for the week (probably)


OK, I HAVE to get back to work on my Christmas cards.  I'm 80% done with them, but I need to write the little newsletter thing that goes with them.  AND, I have DT projects that I need to get to.  The problem is, I keep getting sidetracked by challenges I want to get done.

This card is for the current Runway Inspired Challenge (big shout out to my blog buddies Nina, Wida and Virginia for being named to their new DT!) and also Pamela Young's current sketch challenge.


I was inspired by the triangles in the back of the dress from the RIC inspiration photo....I had triangles on the brain since I just used this same triangle border stamp from Mama Elephant's trifecta border.  So, I combined the two to create the center pennant. 

I stamped the border on five different patterned papers from My Mind's Eye's Six by Six Quilting Bee pad.  The base piece is also from that pad.  Then I stamped the border on a piece of plain cardstock, turned it around and overstamped it so I got a straight line on both sides of the pennant, and cut out the pennant shape.  Then I cut out the individual triangles from the patterned pieces and adhered them to the base piece (hopefully that all made sense).


The sentiment is from Neat & Tangled's Kindness Matters set.  I added some color using a blending pen and Cranberry cardstock, and fussy cut it and mounted it on two layers of vellum. 

Thanks for visiting, have a great day!

Supplies Used
Paper/Cardstock:  My Mind's Eye - Six by Six Quilting Bee; CTMH - White Daisy and Black Cardstock, White Daisy bulk card base; Michael's - open stock vellum
Stamps:  Neat & Tangled - Kindness Matters; Mama Elephant - Trifecta
Ink:  CTMH - Black and Cranberry
Other:  CTMH - Blending Pen; Tombow - Mono Adhesive and Mono Vellum Adhesive


Tuesday, November 27, 2012

The Beat of Your Own Drum


After a couple weeks off, Elle's Studio's layout sketch is back. 

I've been wanting to scrap these photos for a while.  I just kind of shake my head every time I look at them.  Carina loves to 'accessorize' her outfits.  This morning she asked me to put one of her new barrettes in, which looked very cute.  Then she decided that she wanted to wear her swim diaper, and her crocs, and she wanted her picture taken.  I love how her pajama bottoms look kind of like capris since they got hiked up when she was struggling with the swim diaper.  The girl is a crazy mess, but pretty funny.

I've been working on incorporating more stamping in my layouts, and I managed to incorporate stamps from three different companies:  Neat & Tangled, Mama Elephant, and There She Goes.  A little sparkle, a little stitching, and done!  Although in all honesty, this one took a little longer than I thought it would....it's pretty simple, but it took me a while to pull together all the parts.


Hope your week is off to a good start.  First day back after five off for me, not too bad, actually managed to get a fair amount done.

Supplies Used
Paper/Cardstock:  CTMH - White Daisy and Colonial White Cardstock; Jenni Bowlin Studios - Turquoise Tiny Dot; My Little Shoebox - Pretty Little Things; American Crafts - Pink cardstock (not sure the actual name)
Stamps:  Neat & Tangled - Kindness Matters; Mama Elephant - Good Times; There She Goes - Oh Snap
Ink:  CTMH - Black and Hollyhock
Other:  Elle's Studio - Noted Journaling Circle Tags, Handmade Layers Cutouts, True Love Pennants; American Crafts - Amy Tangerine Scene Glitter Foam Thickers; Tombow - Mono Adhesive; 3L - Large Dodz Adhesive; Pigma - Black Micron Pen; Sewing Machine

Monday, November 26, 2012

Joyeux Noel


Hey everyone!  I'm exciting to be participating in the reveal of a new stamp set at Skipping Stones Design today.

It's a really beautiful, vintage set called Victorian Christmas.

I went very glittery with this one!  I used Coredinations Glitter Silk for the base.  I cut the frame and added 'mitres' in the corners with a scoring tool, and then lightly colored it using a gold Gelato.


The tag was cut using the Cricut Art Philosophy cartridge.  I embossed the tree in white and then added color using Topiary ink and a sponge.  Then I added some red glitter sparkles and metallic gold trim for extra sparkle.  Finally, I cut the little banner using the Cricut Artiste cartridge and stamped the sentiment.


This one totally put me in the Christmas spirit!  Thanks to Katie and Heather over at SSD for inviting me to take part in the big reveal!

Hope your week is off to a great start. 

Be sure to stop by the Skipping Stones site to check out the full reveal of the new set!

Supplies Used
Paper/Cardstock:  CTMH - Colonial White cardstock and bulk base, White Daisy cardstock:  Coredinations - Red Flash Glitter Silk
Stamps:  Skipping Stones Designs - Victorian Christmas
Ink:  CTMH - Cranberry and Topiary
Other:  CTMH - Cricut Artiste and Art Philosophy cartidges, Dimensional Foam Tape, Red Glitter Sparkles; Misc - Gold trim; Bone Folder; Faber Castell - Gold Gelato; 3L - Large Dodz Adhesives; Tombow - Mono Adhesive

Sunday, November 25, 2012

Done


Compared to my last couple layouts, this one is rather stark, but I had a great time putting it together.  It's for Pretty Little Studio's current sketch challenge. 

This was a photo I 'rescued'.  When I took it, it came out really dark, but I played with the brightness/contrast a little and this is what I got.  I really like the kind of halo/glow effect around Carina, and the expression on her face. 

I took it much less literally than I usually do.  I used my new Mama Elephant Trifecta stamp set (I think this is going to be one of my favorites), and a blend of stamping and pieced triangles to add some color/pattern.  The title was cut using the Cricut Artiste cartridge.  I also inked the edges of my photo....something I don't normally do, but especially with all the white on this layout, I think it makes the photo pop.

Have a great end to your weekend!

Supplies Used
Paper/Cardstock:  CTMH - White Daisy, Black, and Holiday Red cardstock; Pretty Little Studio - April Showers patterned paper
Stamps:  Mama Elephant - Trifecta
Ink:  CTMH - Black and Desert Sand; Hero Arts - Bubble Gum
Other:  CTMH - Cricut Artiste cartridge, Bonding Memories Adhesive; Black Pigma Micron Pen; Tombow - Mono Adhesive; Kuretake - Glue Pen

Saturday, November 24, 2012

Ellie & Da Ayi


Another vacation photo and layout using Studio Calico's Central High kit.  This one uses the current PageMaps sketch.

Ellie and my older sister have a special relationship.  She's the aunt who spoils, and Ellie is fiercely protective of her.  She'll take up her side in any conversation where someone might say something she even perceives as critical of her Da Ayi.  She has on a number of occasions corrected my Dad, which is rather amusing.


Anyway, I supplemented the kit a bit in the area of embellishments.  That great orange ricrac is Webster's Pages, and I used some CTMH sparkles and Twinery twine.  I also pulled out my Amy Tangerine Sketchbook stamps too.


OK - off to bed.  My parents/sister kept the girls another night so we were able to go to dinner today.  I also got all the Christmas stuff out, took a bunch of clothes up to the attic, did filing, I'm ready for some sleep!

Have a great evening!

Supplies Used
Studio Calico Central High Kit
Other:  American Crafts - Amy Tangerine Sketchbook Clear Stamps; Webster's Pages - Halloween Ribbon & Trim; The Twinery - Marigold Twine; Memento - Tuxedo Black ink; CTMH - Blue & Green Sparkles, Dimensional Foam Tape; 3L - Large and Small Dodz adhesive; Tombow - Mono Adhesive; Sewing Machine

Friday, November 23, 2012

Piggy Tails


A while back I was lucky enough to win the Central High Studio Calico kit, and I was finally able to get it out and start creating this weekend.

The papers/colors are perfect for some of our summer photos. 

These are just a couple photos of Carina in pigtails from our Lake vacation.  She's a mess in general, so it's no surprise that he hair ends up being a wreck even when it's up....and she's got cherry juice all over her face, although it's not so apparent in black and white.

I really didn't add anything to the kit except a few Elle's Studio tags, and a whole lot of machine stitching. 

I really loved that stitched fabric print from the Basic Grey Clippings line that was in the kit and so I followed it when I stitched the upper and lower borders.

Here's a detail of the stitching: 


For this layout I followed Studio Calico's sketch of the week, my first time playing along.  It was a lot of fun, so I'm planning to participate more regularly....and I already have another layout using the kit in the works....should be done to share tomorrow....

Hope that you all had a great Thanksgiving!  Ours was very nice, and we had a second Thanksgiving meal this evening since my sister wasn't able to fly in until today.  The girls are sleeping over at my parents tonight, so I'm hoping to get most of the Christmas decorations up tomorrow to surprise them when they come home.

Have a great evening!

Supplies Used:  Studio Calico - Central High Scrapbooking Kit; Elle's Studio - Lil' Snippets Tiny Labels, Bright Pennatns, The Sweet Life Tidbits; CTMH - Liquid Glass; Tombow - Mono Adhesive; Sewing Machine

Tuesday, November 20, 2012

Three in one


Today's card (that just made me feel like Teri Anderson, ha ha) is for several challenges, a couple that are new to me, and one that I haven't participated in in a while.


First, my friend Debbie Marcinkiewicz recently opened her own stamp company, Paper Sweeties, and this month she started a new monthly sketch challenge.  There are all sorts of adorable sets in her store.  I used a sentiment from the Occasions set on this card. 


The second challenge I'm entering this in is also new to me:  Inspired by Stamping.  Here's the inspiration photo.  I was inspired by the colors and also the round ornament shapes and the hints of gold. 


Finally, I also drew some inspiration from Moxie Fab World's new Tuesday Trigger.  The doilies kind of remind me of the frames in the inspiration photo.


Have a wonderful evening!

Supplies Used
Paper/Cardstock:  My Mind's Eye - The Sweetest Thing Lavender 6x6 pad; CTMH - Smoothie cardstock
Stamps:  Paper Sweeties - Occasions
Ink:  CMTH - Chocolate
Other:  Punky Sprouts - Lacy Blossoms; Maya Road - Twine Cording Shine Gold; CTMH - Antiqued Copper Designer Brads; Tombow - Mono Adhesive

Monday, November 19, 2012

Warm Wishes


I made this card for two challenges....only one of which is still active....I must seriously learn to read dates more carefully!

Even though the PageMaps sketch has closed, ScrapFIT Workout #79, Tape it Up, is still active.

I'm not so sure about this card....its one of those where I kept thinking I needed something else, and now I'm not sure if I went a little too far with it.


The stamps are Paper Smooches:  Cyber Cafe and Hot Concoctions, and the papers are AC HollyDay.

Hope you had a good start to your week.  Tomorrow is my Friday since the girls are off Wednesday.

Supplies Used
Paper/Cardstock:  American Crafts - Hollyday; CTMH - White Daisy cardstock and bulk card base
Stamps:  Paper Smooches - Hot Concoctions, Cyber Cafe
Ink:  CTMH - Black, Topiary
Other:  CMTH - Blending Pen, Craft Knife; Freckled Fawn - Mod and Green Stripe; Kuretake - Glue Pen; Tombow - Mono Adhesive

Sunday, November 18, 2012

Busy, busy, busy!


Thanksgiving is on Thursday, seriously???  I guess that I'm not so concerned about that fact as I am that this means Christmas is just around the corner.

Anyway, I've been trying to wrap up projects before I have to actually clean up the craft/dining room....new things coming, but nothing I can share just yet, so I thought I would share this card that I made a while back.

Super CAS.

The spoon is from Sweet Stamp Shop's Cool Scoop stamp set.  It's colored with Spectrum Noir markers and I added some Liquid Glass to the little heart.

The letters are Basic Grey stickers.

Hope it give you a chuckle to start your week! 

Supplies Used
Paper/Cardstock:  Bazzill Card Shoppe - White Cardstock; CTMH - White Daisy cardstock
Stamps:  Sweet Stamp Shop - Cool Scoop
Ink:  Memento - Tuxedo Black
 
Other:  Basic Grey - White Alphabet Stickers

Thursday, November 15, 2012

Hello Beautiful! First Little Tangles Challenge


Hey everyone!  Welcome to the very first Little Tangles Challenge!

Our theme for this challenge is Say Hello, and I chose to use the Fresh Blooms set for my card. 


I pieced the small flower repeatedly to create a pattern, almost like creating your own patterned paper.


This one was very time intensive.  Each flower was stamped twice.  Once in the more solid paper and once on the lighter patterned paper.  I cut the center portions of the lighter pieces and adhered them to the larger.  Then I attached them to the base piece of paper with small Dodz adhesives in the center of the flower so that the petals still have some movement/dimension.

The centers are accented with Liquid pearls.


Your mission, which I truely hope you will accept, is to create a 'Hello/Hi' card.  You don't have to use Neat and Tangled stamps, although we do love seeing them out there, so much so that Danielle created some great digital images that you can download at the Little Tangles blog

And of course, there is a prize:  the winner will receive the Neat and Tangled stamp set of thie choosing!


And, for some additional inspiration, please be sure to check out the rest of the Design Team's projects: 
Thanks for coming by and hope you can play along!

Supplies Used
Paper/Cardstock:  MME - Six by Six Meadow papers; CTMH - White Daisy and Black cardstock
Stamps:  Neat and Tangled - Fresh Blooms
Ink:  CTMH - Black
Other:  Kuretake - Glue Pen; 3L - Small Dodz Adhesive; Ranger - White Opal Liquid Pearls; Tombow - Mono Adhesive

Wednesday, November 14, 2012

Carina and Po Po


I haven't gotten to play along with the Pretty Little Studio sketch lately, but I really liked this week's, and I just ordered some prints from Shutterfly, so here I am with a layout to share.

These photos are from our vacation this summer with my family - Carina and my mom hanging out on the screened in porch of the home we rented.  Since my parents are no longer 7 hours away, but just a half hour and we see them pretty regularly, I haven't been good about taking photos of them with the kids.  It was nice to have an excuse to have the camera out and be snapping away while we were on vacation.

The sketch was very structured this time, and I really kept this layout simple.  I'm using PLS's Sand Castle collection.  I cut two pieces to create the background grid, and stitched around each of the four quadrants as well as the white cardstock mat for the photos.

Then I cut the quilt square elements from another of the Sand Castle prints and mixed in some cardstock squares for journaling.  It's kind of a CAS modern feeling layout, and other than all the stitching was really pretty easy to put together.

Short and sweet, I'm off to bed, but please stop by tomorrow.  I'll be sharing my card for the inaugural Little Tangles Challenge!

Supplies Used
Paper/Cardstock:  PLS - Sand Castle papers; CTMH - Twilight and White Daisy cardstock
 
Other:  American Crafts - White Prancer Thickers; Sewing Machine; Tombow - Mono Adhesive; Pigma - Black Micron Pen

Punky Sprouts - Quick and Easy Holiday Projects


Oh the joys of Blogger!  This post was supposed to go live on Monday....same time as my first post over at Punky Sprouts, but unfortunately didn't, so here it is, a few days late....

Decor is not my usual forte. If you saw the state of my house you would know why....cleaning is a challenge let alone decorating! That said, I was a little nervous about it being my first assignment, but I really like how this turned out.

This mini garland is an easy project that anyone can do. I'm using it to display cards here, but you could use it plain, decorate a small tree, lots of possibilities.


To create the garland, I folded over the wide Lil' Canvas Stems, placed Lil' Canvas Petals between the folded halves about 5 inces apart and stitched it all together.

I lightly sprayed the entire thing with Lindy's Gang Bit o' Bubbley.

The Lil' Canvas Petals are deocrated with crocheted flowers that were also sprayed with Lindy's Gang mists: Cathedral Pines and Rudolph's nose, buttons and Lil' Twiney.


Really simple and easy to do.

I also decided to make an easy ornament. I stamped two of the Lil' Canvas Petals with a large Christmas tree stamp. The canvas absorbs a lot of ink, so I ended up stamping on the petal three times to get the more vibrant color. I cut two small pieces of Lil' Canvas Stems to create the tree trunk, adding the color by pressing the pieces directly onto my stamp pad. Then I glued the pieces together like a sandwich with craft glue in the center, adding some Lil' Twiney in between as well.


As I mentioned, this is a really easy project. You could easily do this with kids.....if you're reluctant to turn them loose on your stamps, try using fabric markers instead. 

Hope these projects give you some ideas for the holidays!

Supplies:
Punky Sprouts - Funky Punky Fiber Pack, Canvas Lil Petals available HERE
Lindy's Stamp Gang - Cathedral Pines, Rudolph's Nose, Bit o Bubbly available HERE
CTMH - Crocheted flowers, kraft buttons, Topiary and Chocolate Inks, Holiday Magic Stamp Set
Other: Sewing machine; Helmar - Craft Glue

Sunday, November 11, 2012

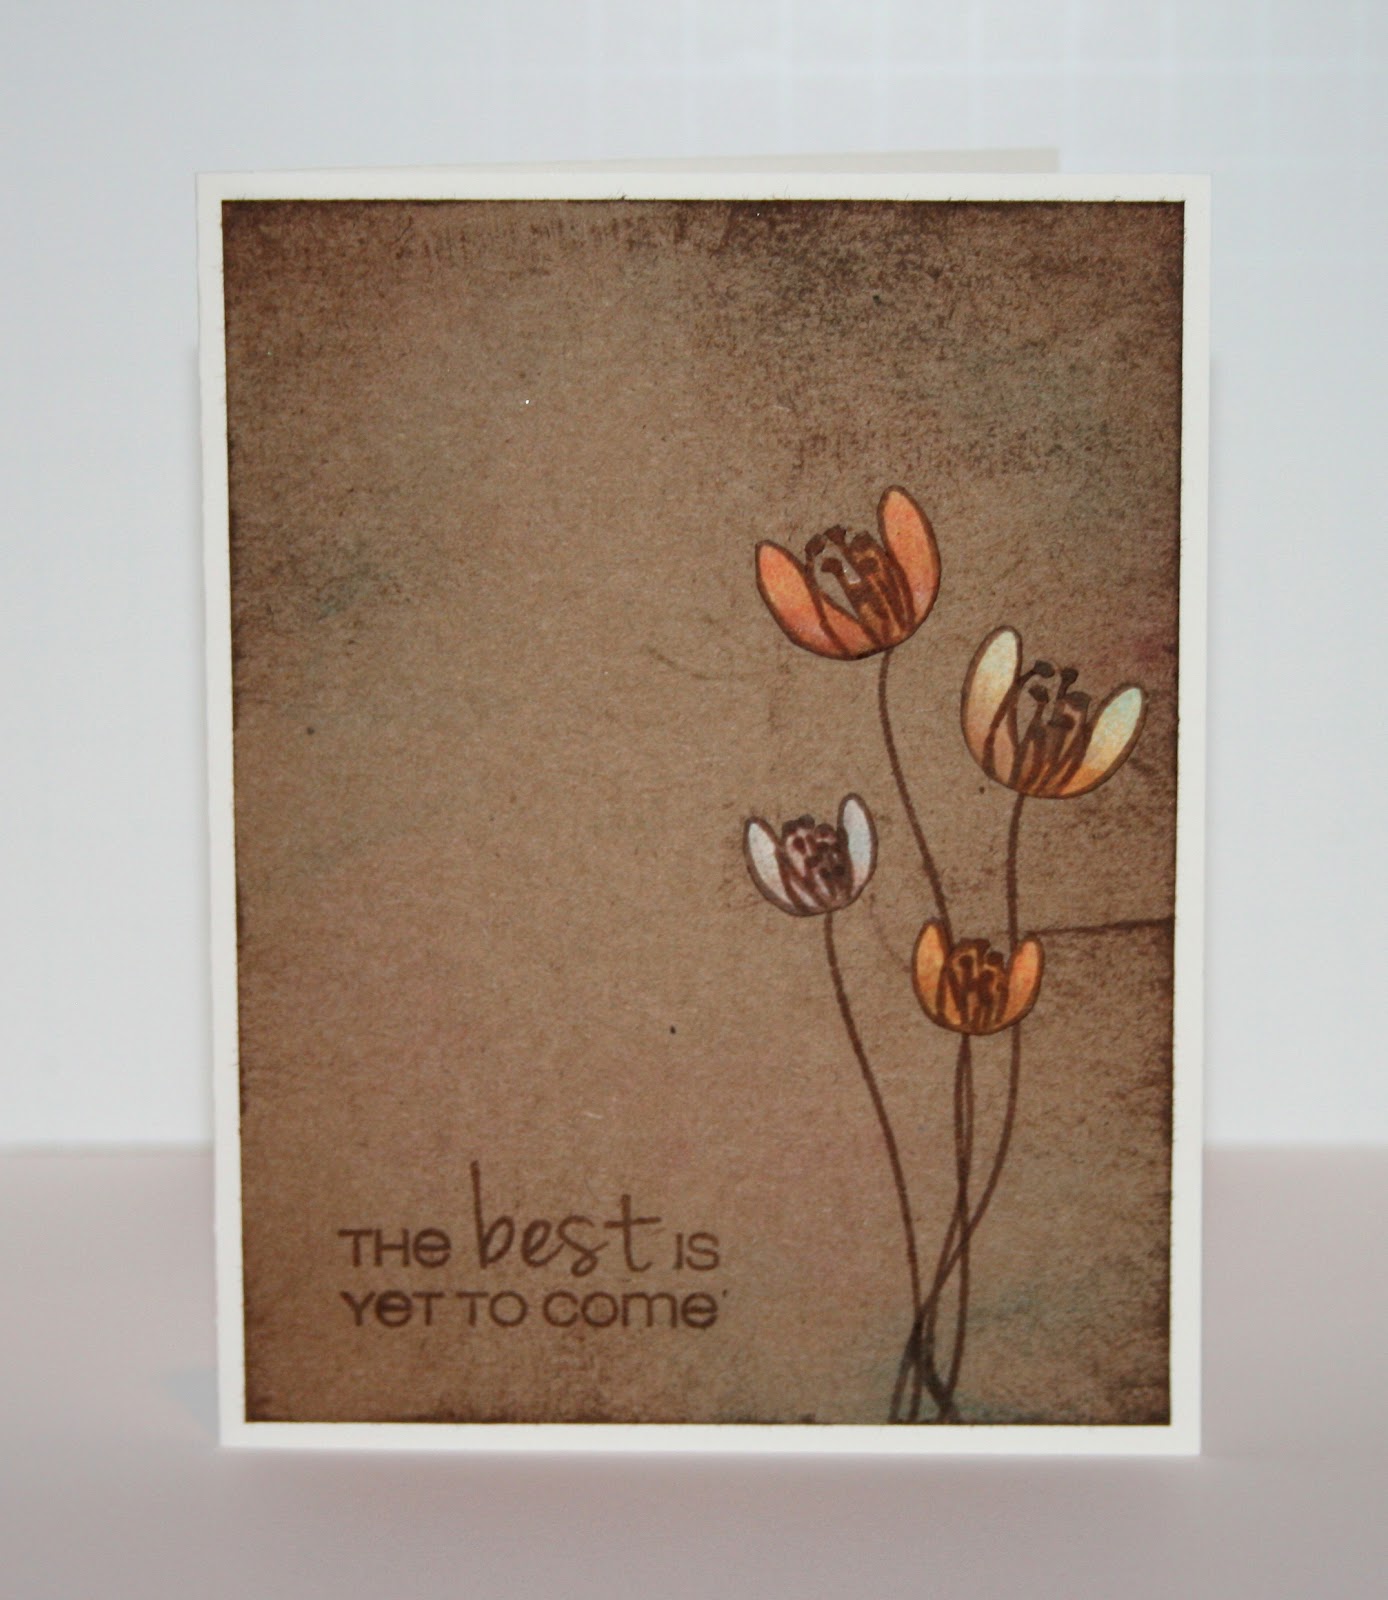
The Best is Yet to Come, CSC116


Seems like it's been ages since I played along over at CASE Study, but as soon as I saw this week's card by Angeline Yong (below) I knew I wanted to play along and, and I knew exactly which stamps I wanted to use.


I was lucky enough to win one of CAS-ual Friday's inagural stamps, Truth Is, last month.  I'm using the flower images, but instead of using the whole image, I chose to use just the center part to mimic the smaller flowers in Angeline's card.

The background is a piece of craft cardstock that I distressed using a sponge, some direct to paper swiping with my Chocoalte stamp pad, and also some new Distress inks that I got in the mail last week from blogger Nichole of Creatique Candy.  LOVE plaing with new stuff!

I stamped just the stems of the flowers on the cardstock, and then I stamped the flowers on some patterned papers and fussy cut them.  I added some additional color to the flowers using my blending pen and the chocolate and distress inks, and touched them up with a Spectrum Noir marker.


Thanks for coming by!

Supplies Used
Paper/Cardstock:  CTMH - Kraft cardstock, Dreamin' papers, Colonial White bulk card base
Stamps:  CAS-ual Friday's - Trush Is
Ink:  CTMH - Chocolate; Ranger Distress Inks - Salty Ocean and Pickled Raspberry
Other:  CTMH - Blending Pen; Kuretake - Glue Pen; Spectrum Noir Markers - EB5; Tombow - Mono Adhesive

Saturday, November 10, 2012

Happy Winter


I was determined to play along with the Cloud9 challenge this month.  I have been meaning to since they started it up this summer, but I often find myself out of time on things.  Here's this month's inspiration picture: 


WPlus9 has some great products, but my favorite items from their recent releases have been the quilt cut dies.  I love using quilts as themes/inspiration in both my scrapping and cardmaking, and these dies really make it pretty easy to be a quilting pro.

The other thing that I love about quilts is that they can look very vintage/rustic/folk art, but you can also create very modern designs.

This card is kind of a hybrid.  If you look at it and see the flower in the middle it's a traditional quilt, but since I used a bold color in the corners, if you focus on those, you see four squares shooting out from the center, which makes it more modern.  Kind of an optical illusion card.

 
I used the Xyron to make adhering all the pieces easier - just ran the quilt outline as well as all the pieces through.  Totally simplifies life!

Since I wanted to keep it pretty clean, and close to modern looking, I went with a very simple Bella Blvd sticker as the sentiment and dressed it up with some sparkles. 

Hope that you are enjoying your weekend...it's SO nice here this weekend, sunny and 60s, so we've been outside working on leaves and lots of playdates scheduled too.

Supplies Used
Paper/Cardstock:  MME - On the Bright Side 6x6 paper pad; Echo Park - Happy Days 6x6 paper pad (turquoise); CTMH - White Daisy cardstock and bulk card base
Other:  WPlus9 - Quilt Cuts 2 dies; Xyron - 5" Creative Station; Bella Blvd - Winter Wonder stickers; CTMH - Blue and Green Assortment Sparkles; Tombow - Mono Adhesive

Friday, November 9, 2012

First four blogged cards

My blog friend Amy Tsurata is celebrating five years of blogging...pretty impressive right?

She posted her first four blogged cards and challenged us to do the same.

I was a little nervous about posting those because I remember my first cards as being pretty experimental, but here they are.....


Well, at least I can say I've been making some progress...all of these cards were based on sketches, and while I love a good sketch, I"m definitely not so reliant on them anymore.  And, while it's still a bit of a struggle, photos are much better these days.

Thanks for coming by and....if you dare.....link up your first four cards too! 

Thursday, November 8, 2012

Very Merry Christmas


It's no secret that I'm a big fan of Elle's Studio and their weekly sketch challenge.  This week they issued a bonus challenge - for a card. 

Oddly enough, I've never actually used Elle's items on a card before.

I stayed pretty true to the sketch, and had a lot of fun playing with circles.  There are a variety of Elle's products - the small tidbit circles, pennants (my favorite items), and a journaling card was even used as the base/center element.

Oh, and I got to break out some of my Bossy Joscie flair too, so that was an extra bonus.

AND since I did use a journaling card, I'm going to link this up with the Moxie Fab World Journaling Card Challenge.

Just one more day til the weekend!

Supplies Used
Paper/Cardstock - Recollections - Red Cardstock; CTMH - Colonial White card base and Topiary cardstock
Stamps:  CTMH - Say it in Style; The Alley Way Stamps - Christmas Magic
Ink:  CTMH - Black
Other:  Elle's Studio - The Sweet Life Tidbits, Collected Large Journaling Tags, Handmade Layers Pennants, Bright Pennants; BossyJoscie - Cherry Christmas Flair; CTMH - Dimensional Foam Tape; Tombow - Mono Adhesive

Wednesday, November 7, 2012

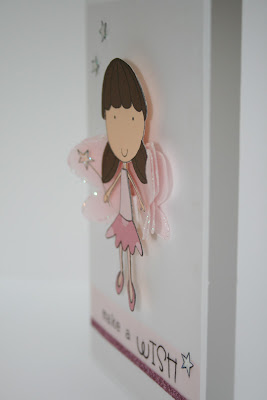
Make a Wish


I love this card.  I made it a while back and submitted it for some publications, but no takers.

It's Jane's Doodles' Tooth Fairy Klara set, although I'm just using her as a fairy and not the tooth fairy.

I wanted to add a lot of dimension to the card, so I created my own wing template by stamping the image on some scrap cardstock, and then drawing in what I thought the full wings would look like.  Then I traced the template on vellum three times, cut it out, added glue and Prisma glitter to the edges and sewed them togetther.  The entire wing piece was then attached to Klara with a large Dodz adhesive.


She's pieced, and much of her outfit came out of the scrap bag.  She was also very fragile/delicate since her neck is so skinny, so I added a toothpick along her spine to stabilize the image (did this before I added the wings). 


I wanted a really soft background, so I just added a sheet of vellum over top the cardstock, and also stamped the sentiment on the vellum. 

I  stamped the image a few more times for the star embellishments, that were glittered also. 

The strip of glitter beneath the sentiment is a piece of American Crafts glitter tape that was cut down.

Have a great evening!

Supplies Used

Paper/Cardstock:  CTMH - White Daisy, Chocolate, and Parchment cardstock; Michael's - Open stock white and pink vellum; Misc scrap papers
Stamps:  Jane's Doodles - Tooth Fairy Klara
Ink:  CTMH - Black
Other:  CTMH - Bonding Memories Adhesive, Prisma Glitter, Liquid Glass; 3L - Large Dodz Adhesive; American Crafts - Glitter Tape