Monday, April 29, 2013

Happy Birthday to You! For CASual Fridays and Simon Says Stamp


Popping in quickly to share a birthday card for CASual Friday's Birthday Bash challenge.  I'm also linking up at Simon Says Stamp for Anything Goes week.

This one makes me sing ;)

For the background I used Salty Ocean distress ink, and then flicked water on it.  Easy, but such a fun effect.

The word bubbles were all hand cut.  You could always use dies/die cuts, but I kind of like the more organic look for this one.  The sentiments are from a variety of sets, and the last one was actually done on the computer.  I used the edge of a Zig marker to get the outline around the edge of the bubbles, and popped a couple out for dimension.


Hope you had a good start to your week! 

Supplies Used
Paper/Cardstock:  CTMH - White Daisy
Stamps:  Waltzingmouse - Half Pint Heroes; Avery Elle - Blooming Banner; Lawn Fawn - Check This Out; Jane's Doodles - Just Dad; Digital Sentiment using Kristen ITC font
Ink:  Distress Inks - Salty Ocean; Memento - Tuxedo Black
Other:  CTMH - Dimensional Foam Tape; Tombow - Mono Adhesive; EK Success - Black Zig marker


Sunday, April 28, 2013

5...4...3...2...1 - Waltzingmouse Flower Show Case


Waltzingmouse Stamps has a great competition going on right now.  The details are here, but essentially you need to case one of the artists from the hop.  I've chosen to case my friend JJ.


Now you may have noticed that my card has zero flowers in it, but that's because I don't have an WMS sets with flowers, so I'm using my Half Pint Heroes set.  I love this set, it's so cute and I have to tell you that the sentiments are so versatile.  I find myself reaching for this set all the time just to use the sentiments.

Lots of gold embossing on this one.  JJ used gold cardstock, but I don't have any of that (actually I do, but I don't know where it is), so instead I inked the edges of my mat with Versamark and created gold paper.  Since I thought the card looked a bit too stark with the plain base, I did something similar with it, except that I inked the edges very sparingly to get almost a paintbrush effect on the edges.

I wanted to add a little detail to the image, so I used my Faber-Castell metallic Pitt marker to color in some portions.

The stars are Studio Calico wood veneers that I embossed.  Here's a tip:  the wood seems to kind of soak in the embossing, so you will probably end up doing it twice.   You also need to be prepared to have gold tipped tweezers.....

Gonna link this one up at Simon Says Stamp too, because Anything Goes this week!

Thanks for stopping by, enjoy the rest of your weekend!

Supplies Used
Paper/Cardstock:  CTMH - Outdoor Denim
Stamps:  Waltzingmouse - Half Pint Heroes
Ink:  Versamark
Other:  CTMH - Gold Embossing Powder; Faber-Castell - Gold PITT marker; Studio Calico - Wooden Star Veneers; Tombow - Mono Adhesive; Therm-o-web - Zots Dimensional Adhesive


Saturday, April 27, 2013

Quite Like You for April AEI♥U and Simon Says Stamp Challenge


Last month I took the Avery Elle inspiration photo very literally.  This month, not so much.

I was inspired by the colors and overlapping lanterns.  Since I don't have a round Avery Elle stamp, I pulled out the Rounded Diamonds set and used two of the teardrop sizes.  The whole group of them kind of reminds me of hot air balloons.


I must have had generational stamping on the brain after my Friday post because the whole thing (except for the sentiment) is done in second generation.  I like how the overlapping layers of color are really shown off when you stamp in second generation.

I'm also going to link this up over at Simon Says Stamp since it's Anything Goes week.

Supplies Used
Paper/Cardstock:  CTMH - White Daisy, Goldrush, and Slate cardstock
Stamps:  Avery Elle - Rounded Diamonds; WPlus9 - Quite Like You
Ink:  CTMH - Creme Brulee, Goldrush, Sorbet, Hollyhock; Holiday Red; Garden Green; Slate, and Black
Other:  Tombow - Mono Adhesive

Verve April Diva Dare


So last month I attempted to play along with the Verve Diva Dare and managed to get my dates mixed up so I wasn't able to get my card linked up in time.  Not this month!  And, since it's Anything Goes week at Simon Says Stamp, I get to link up over there too.

This month the dare is to combine the styles of Marisa and Charmaine with a "Bright Blooms and Butterflies" theme.

I'm not sure if I quite nailed the bright blooms part.  I realized that I only actually have one flower image from Verve (from the Wonderfully Made set), which I had used on my last card so I wanted to mix things up a bit.  I still used the flower, but just the very center portion.  I stamped it several times and then fussy cut the centers out, layering them on top of some fancy black trim from Hydrangea Hippo.  I had a bit of fun creating the curved edge too.

The sentiment and butterflies are from the Blue Skies set.  I used a blending pen to add just a bit of color to the butterflies as well as the center of the flowers.

I'm SO happy it's the weekend!  You might have noticed that until yesterday I hadn't posted in about a week....I think that's the longest layoff I've had since I started blogging!  Combination of illnesses, and working on submissions/DT projects, but hopefully we are back to normal here!

Hope your weekend is going well too!

Supplies Used
Paper/Cardstock:  Jillibean Soup - Country Pumpkin Chowder paper; Basic Grey - Paper Cottage 6x6 Pad; CTMH - Colonial White and Black cardstock
Stamps:  Verve - Blue Skies and Wonderfully Made sets
Ink:  CTMH - Black and Hollyhock
Other:  Black trim - Hydrangea Hippo; CTMH - Blending Pen; Helmar - Quick Dry 450; Tombow - Mono Adhesive; Sewing Machine

Friday, April 26, 2013

Guest Blogging at Remember the Good Times - Generational Stamping

I'm sharing a tutorial on generational stamping over at my friend Lisa's blog today.

This is one of the first techniques that I learned when I started stamping, and it's an especially great technique for beginning stampers because it allows you to really stretch your supplies not to mention the fact that it is so easy!

In a nutshell, when you ink up your stamp and stamp it once, that's first generation.  Stamp again without reinking and that is second generation.  Depending on the intensity of the original color, you can stamp it a third time for a third generation image.  This image shows you the three generations of color that are created with my Outdoor Denim inkpad.


There are all sorts of ways to utilize generational stamping in your projects.  I'm sharing just a couple with you today.

In this first card, I utilized generational stamping to build the main focal image in my card.  I stamped from the outside in, starting with the largest images and the lightest color.  The added benefit is that because the darker color is on top of the the lighter layers, it actually makes the darker colors a little more saturated.


For this card I used Avery Elle's Rounded Diamonds set (which my amazing friend JJ helped to design) and another of my newest acquisitions, the Quite Like You sentiment set from WPlus9.

You can also use generational stamping to create a background, as well as to add emphasis with sentiments.  On this next card I used Little Yellow Bicycle's Everyday Words set.  I stamped 'delight' in second generation using Slate ink four times.  Then I switched to Ruby ink and stamped the sentiment again over the third word.  The great thing about this is that you don't have to be totally precise.  If your stamping isn't exactly on top of the original sentiment, it adds a little bit of shadow to your sentiment.  The second part of the sentiment is stamped in Slate in first generation.


Thanks for stopping by today!  Hope that these cards give you an idea on how you can stretch your ink colors as well as your stamps.

Since it's Anything Goes week at Simon Says Stamp, I'll be linking these up over there too. 

Supplies Used
Card 1
Paper/Cardstock:  CTMH - Outdoor Denim and White Daisy cardstock
Stamps:  Avery Elle - Rounded Diamonds; WPlus9 - Quite Like You
Ink:  CTMH - Outdoor Denim
Other:  Tombow - Mono Adhesive; CTMH - Sponge Dauber; Corner Rounder
Card 2
Paper/Cardstock:  CTMH  - Ruby and White Daisy cardstock
Stamps:  Little Yellow Bicycle - Everyday Words set
Ink:  CTMH - Ruby and Slate
Other:  Tombow - Mono Adhesive; CTMH - Sponge Dauber

Friday, April 19, 2013

Punky Playground Display Frame


Hey everyone, here to share a fun, easy project using Punky Playground today.  Punky Playground pieces are 12 x 12 pieces of corrugated cardboard that have scalloped edges.  They come in a pack of two, and you'll need both pieces for this project.

On the bottom piece I cut a 10 3/4" square piece of cardstock centering it.  The papers I chose to use for this project are from My Little Shoebox's Up in the Trees collection.

The second piece of Punky Playground is the front frame.  I measured 1 1/4" in on each side and cut out the center square.  Then I traced the frame on the pink polka dot paper and cut around the scalloped edges.  In the center, I added about 3/8" and cut out the center of the paper.  I scored along the lines that I traced, and snipped the corners in on a diagonal to create flaps that were folded in to create a finished look.  I adhered the front piece of cardstock with Bonding Memories Adhesive, and used Helmar Quick Dry 450 on the small flaps that were folded on the inside edge of the opening.  If you are pressed for time or looking to simplify the project, don't worry about the flaps, just cut right along the traced line in the center of the frame.

Here's what the it looks like without the photos/ephemera:

The trim going across the frame that the items are hung from is Lil Twiney that I crocheted.  It's secured between two Helmar Zapdots.  Additional double layers of Zapdots were used to secure the front and back of the frame.


I used some of the Lil Canvas Stems from the Punky Fiber Pack to hang the frame.

This was a fun, quick project to put together.  I didn't embellish it too much, just added a bit of paper to frame the opening, because I haven't decided who is getting this.  Originally I thought I would give it to Ellie, but I kind of want to keep it now, although she did see it when I was photographing and wanted to know if she could have it....

Supplies Used
Punky Sprouts:  Punky Playground, Canvas Funky Punky Fiber Pack
Other:  My Little Shoebox - Up in the Trees papers; CTMH - Bonding Memories Adhesive; Helmar - Quick Dry 450, Zapdots; Tombow - Mono Adhesive

Thursday, April 18, 2013

Little Tangles Challenge #11 - Embossing


Welcome to another Little Tangles Challenge!  This week we are all about embossing - dry or heat.  If you have been following me for a while now, you know that I have a bit of an attachment to my heat gun.  I LOVE heat embossing.  Here's what I came up with:


I used my newest Neat & Tangled set, On the Strip 2 as well as Kindness Matters.

First I embossed those dot strips in silver on vellum (I LOVE embossing on vellum).  Then I added the sentiment in gold.

When looking at the design, I realized that those little circles are exactly the same size as my Power Punch, so I randomly punched out a bunch of them.  Then I gold embossed a 1/2" strip of vellum and adhered it to the back of the piece so the gold shows through.


The base is Whisper cardstock.

Now it's your turn!  We'd love for you to play along, you can use either dry or heat embossing in you project, and you might just win a free set of stamps!  You don't have to use Neat & Tangled stamps, although we love to see them, and Danielle has some cute free digis here that you can use.  Can't wait to see what you create!

Supplies Used
Paper/Cardstock:  Recollections - Vellum; CTMH - Whisper Cardstock
Stamps:  Neat & Tangled - On the Strip 2, Kindness Matters
Ink:  Versamark
Other:  CTMH - Gold and Silver Embossing Powder; WRMK - Power Punch; Tombow - Mono and Vellum Adhesive

Wednesday, April 17, 2013

When Hot Chocolate is too Hot


I've been neglecting my scrapbooking some, so I am trying to get back in the swing of things.  These photos are from this past Christmas at my parent's house.  We had gone out in the 'snow' which was really more like slush.  Carina didn't last long, so we headed inside for some hot chocolate.....a bit too hot, and Carina resorted to using a spoon to eat it like soup.  When making this layout I realized that I do a lot of layouts that involve Carina eating in odd or messy ways.  I'm going to have to come up with some different topic areas, or she will have a complex when she grows up!

I used Authentique's Carefree papers, and strung the photos on some Twinery Stone twine, attaching it with my Tim Holtz Tiny Attacher.  I left the twine kind of loose, so that I could loop it around a bit, and used some Helmar 450 adhesive to take the twine in place. 

Not an overly fancy layout, but practically speaking they can't all be one photo works of art.  I love being able to spend a couple hours putting together the perfect layout, but I also hate the feeling that I'm getting more and more behind.  Although I'm no longer tied to scrapbooking chronologically, I still do feel pressure (sometimes more than others) to get pages done.  So this is one of those quicker/easier layouts that eases my falling behind anxieties and gives me the freedom to spend time meticulously working on other layouts.

Hope your week is going well!

Supplies Used
Paper/Cardstock:  Authentique - Carefree collection
Other:  American Crafts - Amy Tangerine Muse and Nutmeg Thickers; The Twinery - Stone Twine; Tim Holtz - Tiny Attacher; Helmar - Quick Dry 450; Tombow - Mono Adhesive; Pigma - Brown Micron Pen


Sunday, April 14, 2013

Just for You - Case Study Challenge #136


It's been ages since I played along over at CASE Study, but my buddy JJ is the muse this month, and I had a brainstorm on the way home from church so I thought I would whip up a card.

I used the Arrows mask from Studio Calico's Neverland kit, and added color using a foam tool and sponge daubers.  The nice thing about this technique is that you don't have to be super neat unless you want to be.  I  have color bleeding into adjacent sections, and that is OK with me, and I extended the color above and below the mask too.  This would look just as good very crisp and clean, but I thought I would go for a softer look so that it kind of fades out.


Also, you might look at the list of supplies below and think the colors don't look very true, and you'd be right.  I don't have a sponge dauber/foam tool piece for every single ink I have (nor did I have the patience to meticulously mask all the sections today).  Instead, I have daubers/foam pieces for color families.  Usually I might try and dab out the color that's on it so I can get a more pure color, but for a card like this it doesn't matter as much, so I really didn't do much dabbing out.

The sentiment is from Jane's Doodles Doodle Flowers set.

Really quick and easy.  Lots still to do this weekend:  cleaning, crafting, and some hanging out too.  Hope you are enjoying your weekend!

Oh, and just for fun, you might have noticed that I've been taking most of my photos in a different location - it's in the kitchen, and it works pretty well (unless I waited too long to take the photo and it's dark out).....and this is what you don't see in the background of the photo area....the girls' crafting areas...the sad thing is that it might be cleaner than my area.....


Supplies Used
Paper/Cardstock:  Bazzill Card Shoppe - Gum Drop cardstock; CTMH - White Daisy cardstock; Recollections - Vellum
Stamps:  Jane's Doodles - Doodle Flowers
Ink:  Memento - Tuxedo Black; Ranger Distress Inks - Salty Ocean, Pickled Raspberry, Mowed Lawn; CTMH - Sunkiss Yellow
Other:  Studio Calico - Arrows Mask; Tombow - Mono and Vellum adhesive; Ranger - Foam Blending Tool; CTMH - Sponge Daubers


Thursday, April 11, 2013

Elle's Studio Challenge and some exciting news


It's no secret that I love Elle's Studio sketches, so I was pretty excited when they annonced they were adding a new bi-monthly challenge. 
 
The current challenge is to use a tabbed tag as a frame on your layout.  Here's my take:
 
 
My nephew Collin is a HUGE fan of Ellie.  He's only six months younger than Carina, but they are not really interested in one another.  Ellie on the other hand is fascinating, and they were best buds over Christmas.  Here the two of them are reading Brown Bear, Brown Bear together. 
 
The tabbed tag and the base paper and red polka dot papers are from the Day to Day collection, and there are a couple older Elle's tags too.  I used some Bella Blvd and older CTMH papers as accents, and added a bunch of stitching. 
 
AND, here is my exciting news:
 

I'm joining the Artful Delight design team!  I'll be part of the card team, but for all my scrapbooking friends Artful Delight has both a scrapbook and card kit each month.

My term starts in May, and I'll be posting projects on Fridays.  Here's the official announcement.  I am pretty darn excited!  :)

 
Supplies Used
Paper/Cardstock:  Elle's Studio - Day To Day Collection Papers; Bella Blvd - Birthday Boy; CTMH - Dotty for You
Other:  Elle's Studio - Day to Day tabbed tags; Pieces of Life Tags; The Twinery - Charcoal Twine; American Crafts - Black Prancer Thickers; Sewing Machine; Tombow - Mono Adhesive; Therm-o-web - Zots adhesive; Pigma - Black Micron Pen


Wednesday, April 10, 2013

Guest Designing for Paper Sweeties


Today I'm excited to be guest designing for Paper Sweeties which is owned by one of the sweetest ladies out there, Debbie Marcinkiewicz. Paper Sweetie's is having a Designer Hop all this week, with a new designer revealed each day.  Be sure to leave a comment over there each day because Debbie's going to give a $20 store credit to one commenter. 

The Sweeties are an adorable collection of paper doll themed stamps.  There are several different figure choices and all sorts of great outfits/accessories.

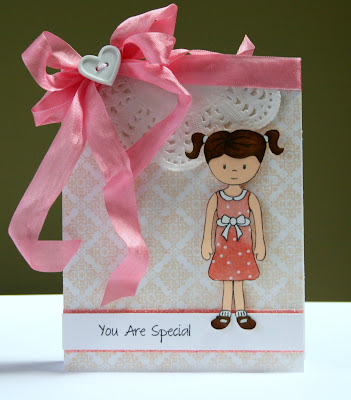
My first card uses Emma (I love her piggy tails) and the You Are Special set.  I really pinked this one up using Glitz's Hello Friend collection, and some pink seam binding.  This is destined for Ellie, whose favorite color is pink.

There's a little bit of sparkle from the AC Glitter tape that I added to mat the sentiment piece.  The little heart button was from my stash, and the doily is from Curtsey Boutique.


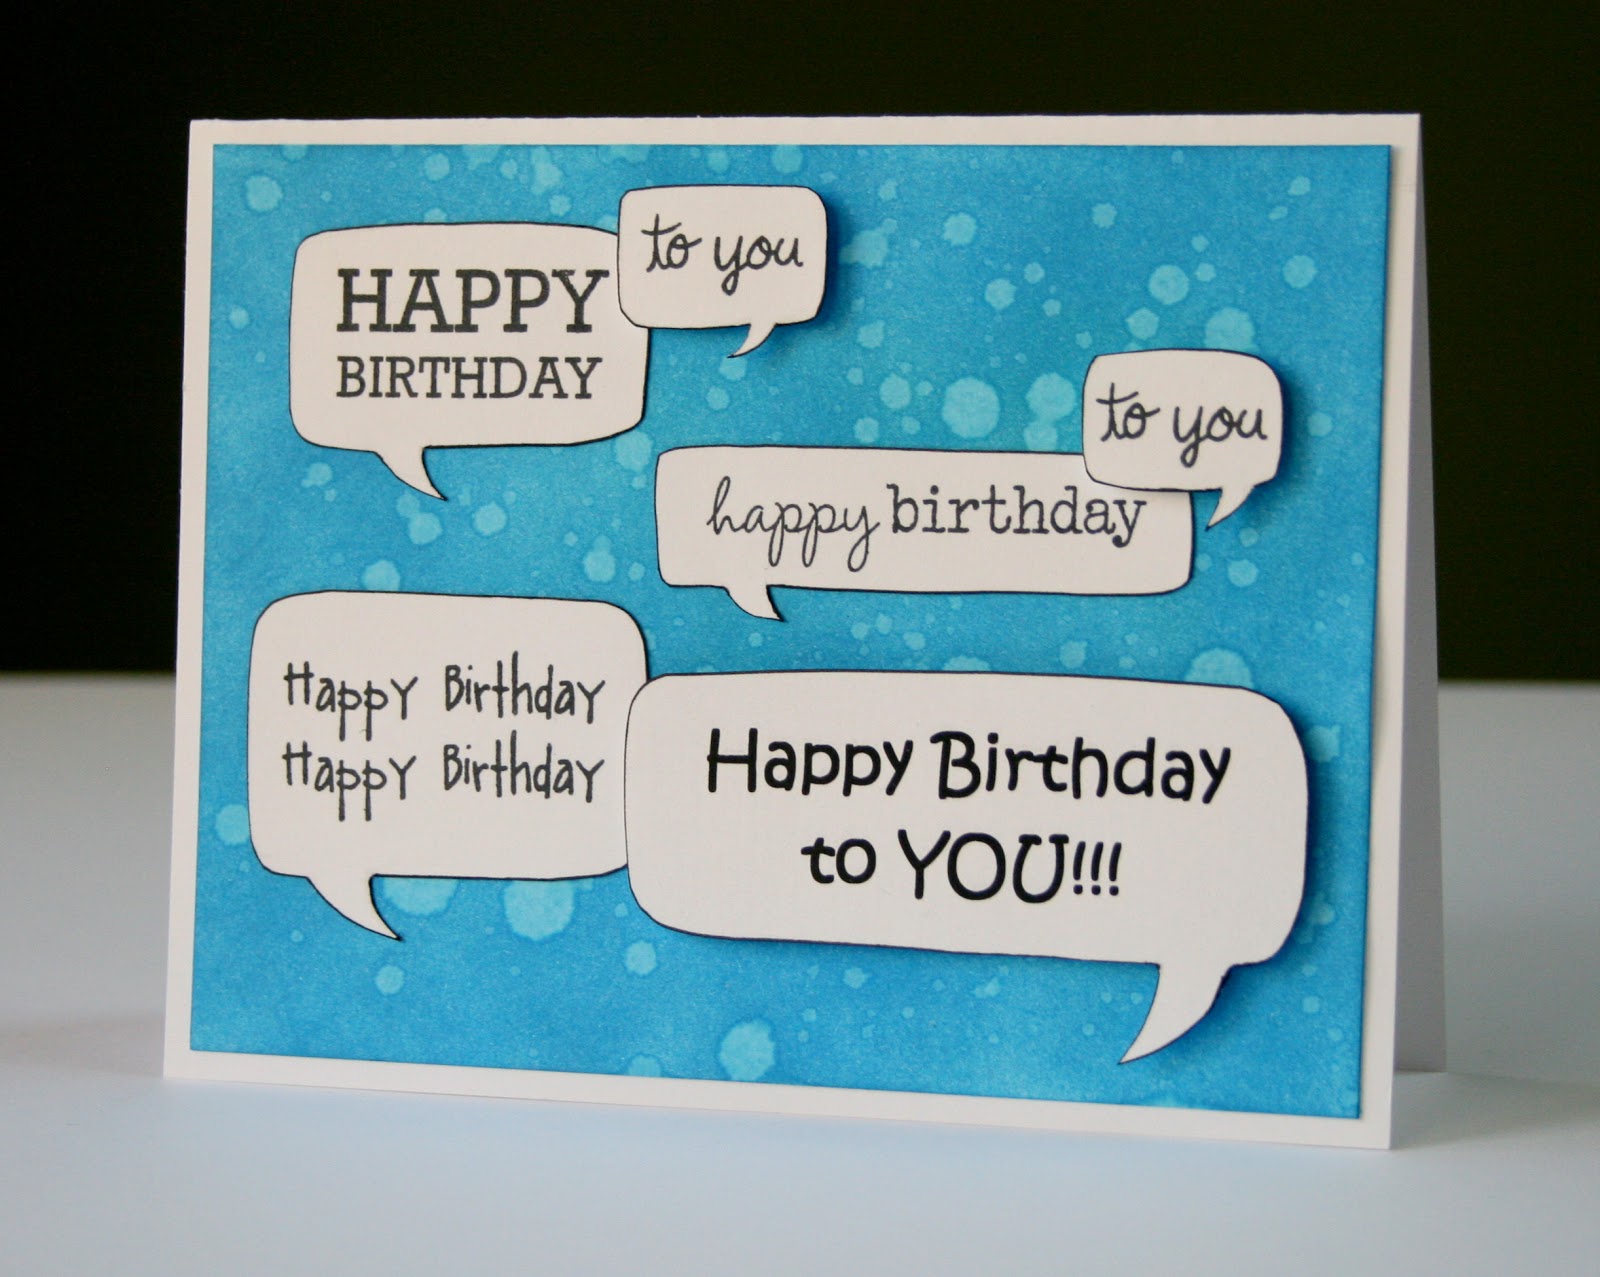
Now I realize that paper dolls aren't for everyone, but there are still lots of great images and sentiments that are good for all occasions.  This next card is a much more CAS style using the accessory images from the Happy Fall Ya'll set and sentiment from the So Proud of You set.


I first lightly sponged the background with blue ink.  The kites are colored with Spectrum Noir markers, and I used a light turquoise on the clouds.  I managed to dry out the lightest shade of turquoise, which is what I normally use.  My work around was that as soon as I finished tracing the clouds in the second lightest turquoise, I went over the edge of the line with the blender pen to make it more subtle.  
  
For the kite tails, I used a technique that I saw here, where you push washi down, lightly cut around the shape with a craft knife, and peel the excess away.  Not the easiest to do with tiny shapes, but I love the effect.   


Thanks so much for coming by today.  Don't forget to head over to the Paper Sweetie's blog, you could win a $20 credit to the store!

Supplies Used
Card 1
Paper/Cardstock:  Glitz - Hello Friend 6x6 paper pad; CTMH - White Daisy, Desert Sand, and Parchment cardstock
Stamps:  Paper Sweeties:  Emma and You are Special
Ink:  Memento - Tuxedo Black
Other:  Spectrum Noir markers; American Crafts - Glitter Tape; Polka Dot Whimsy - Seam Binding; Curtsey Boutique - Doily; The Twinery - Blossom twine; Close to My Heart - Dimensional Foam Tape - Uniball - White Signo Gel Pen; Tombow - Mono Adhesive; Therm-o-web - Zots adhesive; Kuretake - Glue Pen

Card 2
Paper/Cardstock:  Bazzill - Wax Lips Card Shoppe Cardstock; CTMH - White Daisy Cardstock
Stamps:  Paper Sweeties - Happy Fall Ya'll and So Proud of You
Ink:  Memento - Tuxedo Black
Other:  Spectrum Noir Markers; October Afternoon - Woodland Park washi tape; CTMH - Dimensional Foam Tape; Tombow - Mono Adhesive


Tuesday, April 9, 2013

Everything will be okay - RCC80 - Showers and Flowers

 
Hey everyone!  I'm excited to be sharing my first Ribbon Carousel Challenge post today.  This month's theme is Showers and Flowers, and here is my card:


I used the Dreamweavers Umbrella stencil.  I first used a rubber brayer to add black ink to the stencil and then pressed my cardstock directly on the stencil to create the outlines.  I had expected the color to be more even, but the ink kind of beads up on the stencil, which turned out to be a really neat effect. 

The entire piece was then sprayed with Plum Poppy Mister Huey's mist, concentrating the mist in the lower right corner.  I like that it does give the effect of rain as you move away from that bottom corner. 


For the trim, I added started with black grosgrain ribbon.  Grosgrain is one of my favorites, it's kind of that all purpose ribbon that works for almost everything.  A little trick, grosgrain is a great buy even if you don't particularly like the pattern, you can always turn it over and use the solid side, like I did here.  I layered two pieces of sheer ribbon over the grosgrain, overlapping them to get a second layer of color/depth.


The sentiment is one of my favorite Verve Plain Janes, and I finished it off with some My Mind's Eye All is Bright gems.

I'm also going to be linking this card up at Dreamweaver's for their April challenge:  clouds, showers, and mists as well as The Paper Girls Challenge:  April Showers Bring May Flowers.

Be sure to head over to the RCC Blog to check out some more great projects, and link up one of your own - there's a Ribbon Carousel at stake!

Supplies Used
Paper/Cardstock:  CTMH - White Daisy and Black
Stamps:  Verve - Everything is going to be Okay Plain Jane
Ink:  Memento - Tuxedo Black; CTMH - Black
Other:  Dreamweavers - Umbrella stencil; Speedball - Rubber Brayer; Studio Calico Mister Huey's - Plum Poppy; Teresa Collins - Welcome Home Trim Pack; American Crafts - Sheer Ribbon; Tombow - Mono and Vellum Adhesive; My Mind's Eye - Merry and Bright Faceted Gems

Friday, April 5, 2013

TGIF - Celebrate!


SO glad that it is Friday!  I'm celebrating with a fun and EASY card and post that is short and sweet!

This card measures 3 1/2" x 5 1/2".  I added some black glitter tape at the top and then tied that sheer bow.  (Sheer ribbon is hard to photograph, so you're missing a bit of the detail, but you definitely get some of that glitter/sparkle peeking through behind the center of the bow.

Some more glitter tape at the bottom and a fun Mama Elephant sentiment are all this one needs. 

Simon Says Stamp is celebrating their birthday this week with birthday cards and I'm linking this one up because I think it could defintiely pass muster for a birthday, don't you? 

Have a great end to your week/start to the weekend!

Supplies Used
Paper/Cardstock:  CTMH - White Daisy
Stamps:  Mama Elephant - Good Times
Ink:  Memento - Tuxedo Black
Other:  American Crafts - Glitter Tape; Recollections - Sheer Ribbon; Therm-O-Web - Zots Dimensional Adhesive

Thursday, April 4, 2013

Kraft, Gesso, and Kindness


Can you believe that we are already on Little Tangles Challenge #10?

This was a fun one for me, I am a big fan of kraft.


For this card I used the Kindness Matters set.

First I cut the kraft panel for the card and added gesso, heavier at the bottom of the piece and more watered down towards the top.

Once it was dry I stamped my sentiment, coloring the heart in with a Stamper's Big Brush pen.

I stamped the border from Kindness Matters on another piece of kraft painted with gesso.  The little hearts were colored in, fussy cut, and adhered to the card.

Now it's your turn.  We'd love to see your kraft creations.  You don't need to use Neat & Tangled stamps, but we do love seeing them, and there are some free digis available here

Supplies Used
Paper/Cardstock:  Papertrey Ink - Kraft cardstock
Stamps:  Neat & Tangled - Kindness Matters
Ink:  Memento - Tuxedo Black
Other:  Claudine Hellmuth - Gesso; Faber Castell - Red Stamper's Big Brush Pen; Tombow - Mono Adhesive

Tuesday, April 2, 2013

i miss you


Quick post today to share a card a really quick, CAS card.

The base is Whisper cardstock that was sanded down a little to lighten it up and add some texture.

The rectangles are pieces of vellum that I added color to using sponge daubers.  I wanted the colors to really stand out, so I also cut white pieces of cardstock in the same size and added color to those too. 

The sentiment is from the Say it in Style set.

This was a really quick and easy card to make.  You could very easily change up the colors and sentiments and create a set of all occasion cards. 

I'm going to be linking up over at Simon Says Stamp because it's Anything Goes week (I love Anything Goes week). 

Thanks for coming by and for sharing my excitement from yesterday!

Supplies Used
Paper/Cardstock:  CTMH - Whisper and White Daisy cardstock; Recollections - Vellum
Stamps:  CTMH - Say it in Style
Ink:  CTMH - Lagoon, Sky, Ruby, Garden Green
Other:  CTMH - Sponge Daubers; Tombow - Mono and Vellum Adhesive

Monday, April 1, 2013

Good news! No foolin'!

Hey everyone, hope that you guys had a great Easter!

Our was really wonderful.  A meaningful and joyful service at church in the morning, some great time with family, and lots of fun with friends in the afternoon/evening.

And today I get to share some exciting news.  I'm joining the Ribbon Carousel Crew!  I'm so excited to be part of this amazingly talented team.  Be sure to head over to the blog today to check out the rest of the Crew and tomorrow when we unveil this month's theme. 

And since I like posts to include pictures, here are a few from yesterday (I cannot take credit for those fun dresses, they are from my sister Lydia): 


Have a wonderful start to your week!