Hey everyone, just popping in to announce the winners from the BBB giveaway!
First up the winner of the Altenew stamp set: Chitra Nair
Second the winner of a $20 gift certificate to BossyJoscie: Teresa Godines
Third the winner of the $25 gift certificate to Paper Sweeties: Lin
Fourth the winner of the two Neat & Tangled stamp sets: Jingle
And finally, the winner of the big pile of fun.....
Shelly!!!!
Thank you all so much again for all your support and encouragement throughout the year.
And I must also thank my good friends Jen, Joscie, and Debbie for sponsoring those great prizes!!!
I love being able to celebrate with you guys, and there will continue to be chances to win throughout the year. Speaking of which, if you haven't yet, you'll want to head to this post to enter to win one of my Sunday School Songs stamp sets....it's a hop so there are two additional chances to win if you complete the hop.
Hope you are having a great start to your week!
Monday, June 30, 2014
Saturday, June 28, 2014
Neat & Tangled Blog Hop + another Giveaway!
***Just a reminder...my BBB (Belated Birthday Blogaversary) giveaway is open through Sunday 6/29. Click here for that post.

Hey everyone! I'm part of a fun Neat & Tangled hop today highlighting a couple of last month's releases: Photo Booth and one of my new sets, Sunday School Songs. You should have come here from Julie Ebersole's blog, and the hop starts at the Neat and Tangled blog.
I'm featuring Sunday School Songs and I created a couple cards to share today.
First up a very clean and simple card. I love the sunburst pattern on this paper and wanted to make that a focal point.

I stamped the song lyrics and then randomly stamped the sequin from Photo Booth to give the illusion of movement away from the center of the burst. Some gold sequins were added for some extra shine and contrast.
The sunburst paper was adhered to a panel of white cardstock so you can see the cardstock just on the one side and then popped up, I added a strip of black patterned paper on the edge for some good contrast.
My second card is very different in look and feel, but still pretty easy to put together. I love this sweet chipboard piece that my friend Wida sent me and had been saving it for a special project.

I used that for the focal point and stamped the sentiment beneath it. You could always just color in the Jesus Saves part, but I like the extra texture/dimension you get from piecing so those were pieced with some patterned paper scraps.

The trim at the bottom is actually altered. I loved the look of the white portions on the top and bottom, but it's actually a yellow pattern in the center. What to do? Cut a very thin piece of cardstock and adhere it right over top.
OK, for the hop details: Danielle is picking two random winners from all the stops to win their choice of Photo Booth or Sunday School Songs, and of course I had to get in on the prize action, so I'll be picking an extra winner from my blog to win a Sunday School Songs set. Comments close July 4th, and winners will be announced Saturday, July 5th.
That's all for me today. Your next stop on the hop is my good friend Jocelyn Olson. Happy Hopping!!!
Supplies Used
Card 1
Paper/Cardstock: Crate - DIY Shop 6x6 pad; Avery Elle - White Cardstock
Stamps: Neat & Tangled - Sunday School Songs, Photo Booth
Ink: Versafine
Other: Neat & Tangled - Gold Sequins; American Crafts - This to That Foam Adhesive; Tombow - Mono Adhesive
Card 2
Paper/Cardstock: Simple Stories - Vintage Bliss 6x6 paper pad; CTMH - Colonial White Cardstock; Crate - Pretty Party 6x6 pad
Stamps: Neat & Tangled - Sunday School Songs
Ink: Versafine Smokey Gray
Other: Crate - Oh Darling Chipboard Accent/Phrases; Tombow - Mono Adhesive; Kuretake Glue Pen
Hey everyone! I'm part of a fun Neat & Tangled hop today highlighting a couple of last month's releases: Photo Booth and one of my new sets, Sunday School Songs. You should have come here from Julie Ebersole's blog, and the hop starts at the Neat and Tangled blog.
I'm featuring Sunday School Songs and I created a couple cards to share today.
First up a very clean and simple card. I love the sunburst pattern on this paper and wanted to make that a focal point.
I stamped the song lyrics and then randomly stamped the sequin from Photo Booth to give the illusion of movement away from the center of the burst. Some gold sequins were added for some extra shine and contrast.
The sunburst paper was adhered to a panel of white cardstock so you can see the cardstock just on the one side and then popped up, I added a strip of black patterned paper on the edge for some good contrast.
My second card is very different in look and feel, but still pretty easy to put together. I love this sweet chipboard piece that my friend Wida sent me and had been saving it for a special project.
I used that for the focal point and stamped the sentiment beneath it. You could always just color in the Jesus Saves part, but I like the extra texture/dimension you get from piecing so those were pieced with some patterned paper scraps.
The trim at the bottom is actually altered. I loved the look of the white portions on the top and bottom, but it's actually a yellow pattern in the center. What to do? Cut a very thin piece of cardstock and adhere it right over top.
OK, for the hop details: Danielle is picking two random winners from all the stops to win their choice of Photo Booth or Sunday School Songs, and of course I had to get in on the prize action, so I'll be picking an extra winner from my blog to win a Sunday School Songs set. Comments close July 4th, and winners will be announced Saturday, July 5th.
That's all for me today. Your next stop on the hop is my good friend Jocelyn Olson. Happy Hopping!!!
Hop Order:
Danielle Walls (Neat and Tangled) www.neatandtangled.blogspot.
Julie Ebersole http://papertrufflez.
Miriam Prantner http://mprantner.
Jocelyn Olson http://redballooncards.
Anna Kossakovskaya http://
Heather Campbell http://parkermolly.
Laurie Willison http://
Virginia Lu http://virginialusblog.
Savannah O'Gwynn http://savannahland2.
Card 1
Paper/Cardstock: Crate - DIY Shop 6x6 pad; Avery Elle - White Cardstock
Stamps: Neat & Tangled - Sunday School Songs, Photo Booth
Ink: Versafine
Other: Neat & Tangled - Gold Sequins; American Crafts - This to That Foam Adhesive; Tombow - Mono Adhesive
Card 2
Paper/Cardstock: Simple Stories - Vintage Bliss 6x6 paper pad; CTMH - Colonial White Cardstock; Crate - Pretty Party 6x6 pad
Stamps: Neat & Tangled - Sunday School Songs
Ink: Versafine Smokey Gray
Other: Crate - Oh Darling Chipboard Accent/Phrases; Tombow - Mono Adhesive; Kuretake Glue Pen
Thursday, June 26, 2014
Guest Designing for Ronda Palazzari

Hey everyone! I'm so excited to be guest designing for Ronda Palazzari today! She designs some of my very favorite The Crafter's Workshop stencils.
I have two techniques that I want to share today that will allow you to stretch your stencils. First, creating your own patterned paper with stencils.

I used the 12" x 12" Spinning Tops stencil to create the patterned paper for this card. This is the simplest stencil technique possible - inking with a blending tool, but with a twist. After inking the design, I slid the stencil over slightly and inked again. I repeated this twice (so three inked images) to create a continuous row of the tops.

Then I slid the stencil down so that it was halfway between two inked rows, changed ink colors, and repeated the process. Here you can see what the paper looks like after the first inking of the second row. Note there is no requirement for the images to be perfectly spaced, you will get a wonderful new pattern regardless of spacing.

I added a large sentiment from Neat & Tangled which was stamped in black, then overstamped with Versamark and clear embossed.
It's such an easy technique, I wanted to show you how versatile it can be, change up the colors for a totally different look and feel.


Finally, another technique that is frequently used in stamping, but you might not think to use it for stenciling, paper piecing.

For this card I used the 12" x 12" Picture Perfect stencil, choosing just one of the camera images. Then I used an extra fine Sharpie marker to color in the outline of the camera, and fussy cut around the image. This was repeated for each of the major elements. Here's what the pieces look like all cut out and ready to be assembled:

You could adhere everything directly to create a flat piece, but I love adding some dimension to my projects, so I popped a couple of the layers up. I wanted to add a little heart to the center of the camera lens, so I free hand cut a heart and added some faux stencil lines around it.

I wanted the focus to be on the camera, so I just layered a few papers, added some stitching and a few sequins and a sentiment, but the camera is definitely the star of this card.
Thanks so much to Ronda for having me again! I hope you've been inspired to stretch your stencils a bit with these techniques!
Supplies Used
Card 1
Paper/Cardstock: CTMH - White Daisy cardstock; Avery Elle - White Cardstock; PTI - True Black Cardstock
Stamps: Neat & Tangled - My Favorite
Ink: Tsukineko - Versafine and Versamark; CTMH - Black; Distress Inks - Iced Spruce
Other: TCW - Spinning Tops 12x12 Stencil; CTMH - Clear Embossing Powder; American Crafts - Glitter Tape; Tombow - Mono Adhesive; AC - This & That Foam Adhesive
Card 2
Paper/Cardstock: CTMH - White Daisy; Avery Elle - White Cardstock
Stamps: Winne & Walter - The Big the Bold and the Happy
Ink: Versafine Smokey Grey; Hero Arts - Soft Pink; Distress Ink - Iced Spruce
Other: TCW - Spinning Tops 12x12 Stencil; Neat & Tangled - Clear Sequins; Misc Doily; Tombow - Mono and Mono Aqua Adhesive
Card 3
Paper/Cardstock: Avery Elle - White Cardstock; Fancy Pants - Wonderful Day 6x6 pad
Stamps: Mama Elephant - Smitten
Ink: Versafine
Other: TCW - Picture Perfect 12x12 Stencil; Sharpie - Extra Fine marker; Neat & Tangled - Clear Sequins; Tombow - Mono, Aqua Mono, and Power Tabs
Wednesday, June 25, 2014
BBB Giveaway Update!
Breaking news everyone, there is one more prize for the BBB Giveaway! A stamp set from Altenew! Altenew is the crafty love child of two amazing artists/cardmakers: Tasnim Ahmed and Jen Rzasa (who also happens to be another GI12 buddy of mine).
Please DO NOT leave a comment here, if you haven't already go back to THIS POST and leave comments there. Thanks so much to Tasnim and Jen!
Tuesday, June 24, 2014
BBB Giveaway

Hey everyone! I usually do a Birthday/Blogaversary giveaway at the end of May/beginning of June, but I thought with Gallery Idol going on the timing was not quite right, so today I'm unveiling the BELATED Birthday/Blogaversary Giveaway.
It's been a wonderful year, lots of exciting things have happened, not the least of which is the release of my stamp designs, being named a World Cardmaking Day winner, getting into Gallery Idol and making it to the finals, and lots of published cards including (big news) an upcoming cover!
Now it's really not always that exciting....the day to day nitty gritty of creating/blogging isn't always glamorous, but I'm thankful for kind and caring readers/followers. Your visits and comments are always so appreciated which is why I love to be able to do giveaways from time to time.
This year I have several different prizes up for grabs. Some very special crafty friends are helping me out:
Altenew is offering a free stamp set. Altenew is the crafty love child of two amazing artists/cardmakers: Tasnim Ahmed and Jen Rzasa (one of my GI12 buddies).
Please DO NOT leave a comment here, if you haven't already go back to THIS POST and leave comments there. Thanks so much to Tasnim and Jen!

BossyJoscie is offering a $20 gift certificate for her store. Joscie is another one of my GI12 buddies. She is so encouraging, she makes THE BEST flair, and she has personalized stamps too.

Paper Sweeties is offering a $25 gift certificate. Debbie is (you guessed it) another of the illustrious GI12 crew. She is so sweet and her line of stamps is just adorable, I am also very partial to her hand dyed seam binding.

I'm offering two of my stamp sets, which are both currently sold out at Neat & Tangled, On the Corner Additions and Clouds.
And of course there's that big giveaway that you see at the top of this post. It's full of all sorts of goodies I've been collecting over the course of the year.
Just a note, these giveaways are open worldwide, but if you're international and you win one of the 'mailed' items, you must be wiling to pay the difference in shipping.
Thanks to all my very sweet friends who donated goodies to for the giveaways, and thanks to all of you. All you have to do to be entered is leave a comment. If you're a follower you can leave an extra comment for an extra chance.
I'll leave comments open through Sunday evening and announce the winners on Monday. Good luck everyone!
Saturday, June 21, 2014
On the Corner Die Winner!!! And a big thanks!
Hey everyone, just popping in to share the winner of the On the Corner die. Random.org picked #32 who is.....
KAILASH!!!!
Congratuations Kailash, please shoot me your address and I'll get this out to you.
And thanks so much for all your comments, PMs, emails and votes throughout the Gallery Idol competition. I really enjoyed my second turn at the wheel. I had a great time stretching myself and accomplished everything I set out to do.....do my best and leave nothing on the table.
AND, stay tuned because my usual big annual giveaway (for my birthday and blogaversary) were delayed because of Gallery Idol, so I'll have some more chances to win next week.
Tuesday, June 17, 2014
Baby Blog Hop

I'm so happy to be participating in a blog hop today to celebrate the birth of Danielle Walls' new little girl Everly.
I thought I would pull out my On the Corner set for this one, and I went very girly.

Soft papers, a bit of doily, stitching, and sequins, sweet and girly.
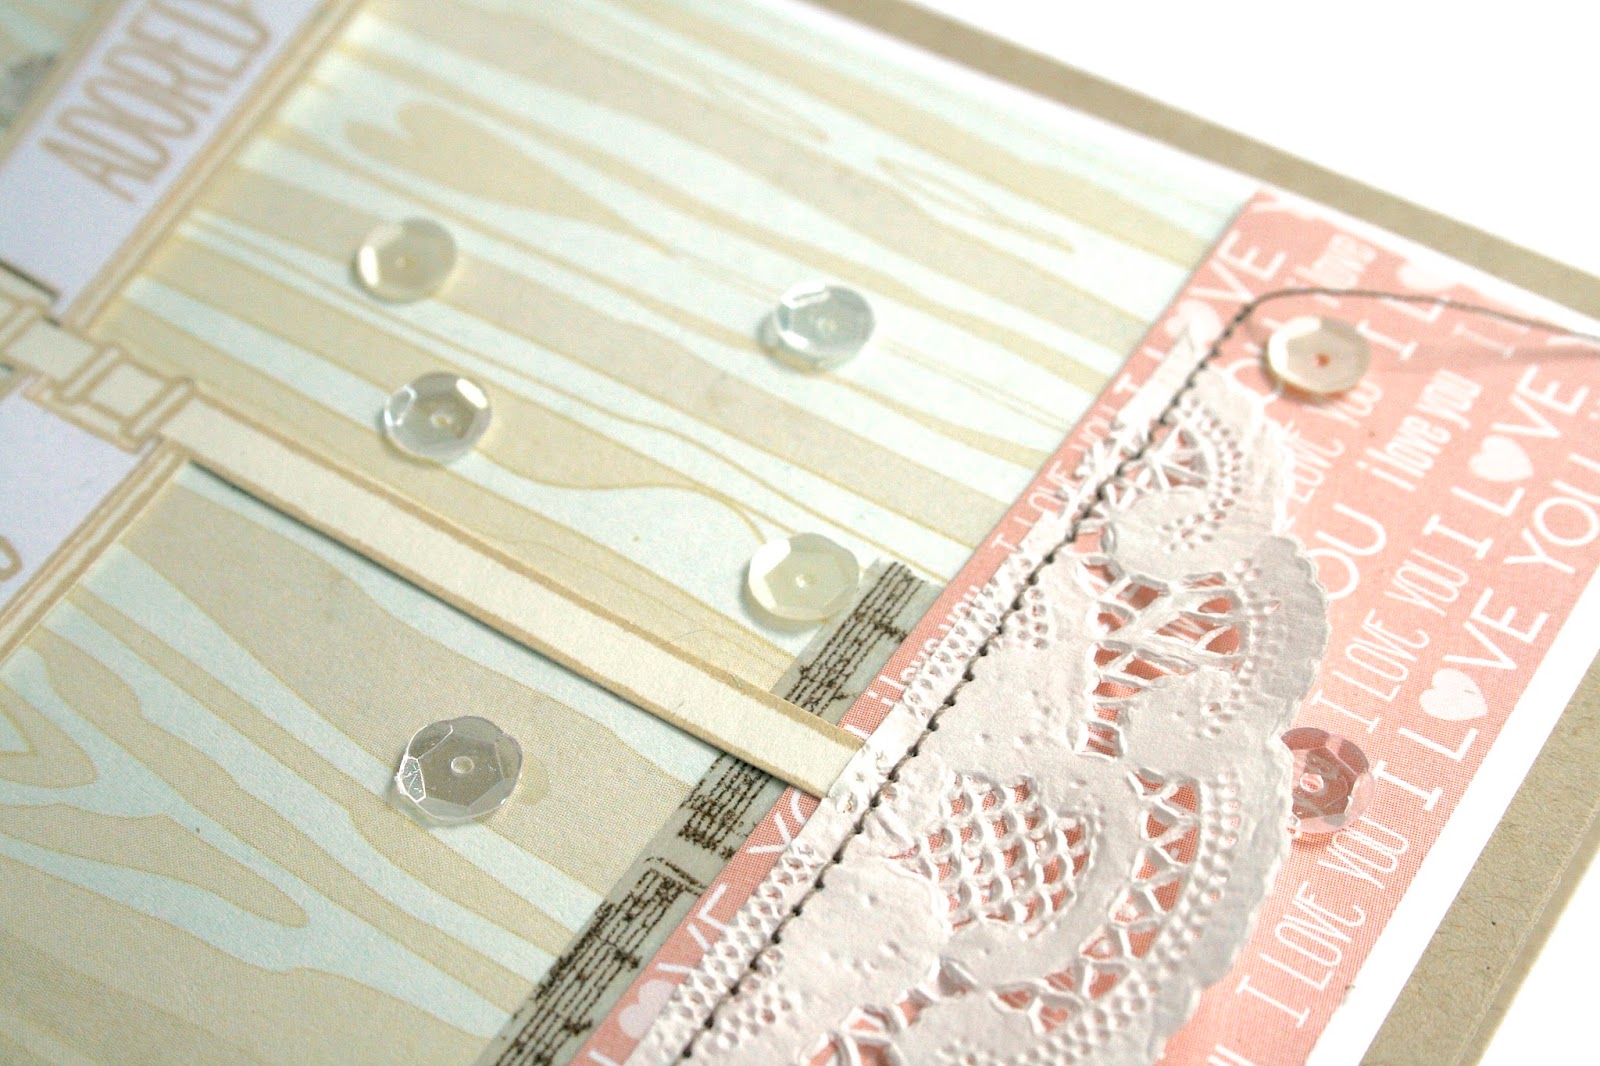
I'm so excited for Danielle, she's got two little ones already, so motherhood isn't new to her, but girls are fun in so many different ways and I know she's going to have a blast spoiling this little one.
I should also mention that I made this a while back, before I had my hands on the new On the Corner die....if you're not a fan of fussy cutting it's now available in the Neat & Tangled store, and we had a hop yesterday to celebrate the release of that die and the A Lot to Say die. I'm giving one of the dies away and so is Danielle, so be sure and swing by yesterday's post if you want to enter.
I am the last stop on the hop, but I have the full list below in case you get turned around.
Neat and Tangled
Amy Kolling
Jessica Pascarella
Evgenia Petzer
Ashley Marcu
Yana Smakula
Linda Trace
June Houck
Betty J.
Amy Trustee
Anna Kossakovskaya
Barb Murphy
Tracy Ercole
Mary Dawn Quirindongo
Heather Ruwe
Mayuri
Christine Drogt
Ren-Yi Lo
Me
Have a wonderful day (and if you haven't voted in the final round of the Gallery Idol competition yet, there's a link at the top right)!
Supplies Used
Paper/Cardstock: BasicGrey - True Love Collection; Teresa Collins - You Are My Happy 6x6 pad; PTI - Kraft cardstock; CTMH - White Daisy and Colonial White Cardstock
Stamps: Neat & Tangled - On the Corner and On the Corner Additions
Ink: Hero Arts - Wet Cement
Other: Punky Sprouts - Doily; Neat & Tangled - Clear and Pearlescent sequins; Misc Washi; Tombow - Mono Adhesive
Monday, June 16, 2014
Gallery Idol Finals - Adhesive

Wow, what a ride! I'm humbled to have made it to the final round of Gallery Idol, and I have to say that I have really enjoyed the whole competition this year. What a great group of ladies, and challenges that really stretched me, especially this last challenge!
This was the hardest round by far. I was really stumped and tried several different things, all which involved making a huge mess out of my craft space (and myself).
At the end of the day, I ended up with something that I think definitely showcases adhesive, but which is very me as well. This is a play on a technique that I'm sure you have all seen - stacking die cuts to create extra dimension, especially word die cuts. I decided instead of using those stacks as the focal point/sentiment, why not create stacks that become the background?
Basically I used adhesive to create little 'bricks' of cardstock. I pulled out several shades of yellow and gray to create an ombre effect, and went to town with my 3/4" square punch. I wanted the scene/background to have movement in both color and dimension. So the bricks are shorter as you get towards the center of the card. At the tallest corners the squares are stacked 14 deep, at the center, they are only 4 deep, and then there are variations between. This took a little bit of finessing, since I used cardstock from several different companies with varying thicknesses, I needed to adjust the numbers of layer a bit depending on thickness.

Once the stacks were created I started thinking about the sentiment/image. I was torn between something really basic because I wanted the background to shine through, but I didn't want anything too simple either.
This Birdie Brown set from My Favorite Things was the answer. Originally I thought to stamp the entire scene on the squares, but I opted for a hybrid, with the sentiment and cityscape stamped directly on the squares and then the girl stamped on cardstock, colored, and fussy cut.
Here's how I went about stamping the sentiment/cityscape: I used removable adhesive on a scrap piece of cardstock to adhere the squares in place and then stamped on them. Then I adhered each of those squares to the corresponding brick in the pattern.

I wanted a more sketchy effect with the girl - to evoke a comic strip feel, so she was stamped in gray ink, and then I went back with a journaling pen to add the lines in, being careful, but not overly careful. I added just a touch of color with some yellow copics to her cape and star.
To assemble the card, I adhered each brick to a scrap piece of cardstock. I also added a little liquid glue between each of the pieces to hold it together a bit more. The entire panel was then adhered to the card and the girl was adhered with foam adhesive.

Thanks so much for all your votes and kind words and comments throughout the competition. As I said at the beginning, it's been a blast. Looking back on my cards I can truly say I love each one and I have none of the regrets I sometimes have about should I have added this or that, or maybe I should have used this color, etc.
Thanks again, and please head over to the Gallery and vote!
Supplies Used
Paper/Cardstock: Avery Elle - Cream, Silver Fox, Fog, and White Cardstock; PTI - True Black, Harvest Gold and Lemon Twist cardstock; MFT - Steel Grey cardstock; Bazzill - Banana Split cardstock
Stamps: MFT - Birdie Brown You're Super
Ink: Versafine; CTMH - Slate
Other: Tombow - Mono and Multi Mono Adhesive; Copic - Y00, Y13, Y18; American Crafts - 01 and 05 Black Journaling Pens; CTMH - Dimensional Foam Tape
Neat & Tangled Dies Blog Hop

I'm so excited about today's big announcement at Neat & Tangled. There are now dies!!!! And I'm so thankful that one of the first dies to release is the street sign from On the Corner. Danielle is also releasing a speech bubble die that coordinates with the A Lot to Say set.


To celebrate, we're having a blog hop! Be sure to leave comments along the way as Danielle will be picking one random commenter to win their choice of the new dies. I had to get in on the action too, so I'll be picking one random commenter from my blog to win an On the Corner die.
You should have arrived here from Christine Drogt's blog.
I was looking back at my On the Corner projects and realized that I fussy cut the street sign on at least 85% of the projects I've made. Needless to say this new die is going to save me a lot of time, and allow me to do something I really haven't contemplated until now: mass produce with the On the Corner set.
To illustrate I thought I would create some tags to go along with the girls' end of year teacher gifts.

These really came together so quickly. The tag bases were cut with my Cricut and Art Philosophy cartridge. Then I just layered some black cardstock with patterned paper and the street sign, and sentiment strip.

For those of you who already own the set this is a must have, and for those of you who thought it might be a lot of work to fussy cut....no longer! Don't forget to leave a comment for your chance to win a die from me, and be sure to keep hopping because there are some gorgeous projects to be seen. Your next stop is Anna Kassakovsk, but I have the full blog hop listed below for you.
Danielle - Neat andTangled Blog
Yana Smakula http://www.zrobysama.com.ua/?lang=en
Christine Drogt http://kartenchaos.blogspot.de
Miriam Prantner http://mprantner.blogspot.com
Anna Kossakovsk http://creativity-mango.blogspot.com
Taheerah Atchia http://littlemisst-papercraft.blogspot.com
Jocelyn Olson http://redballooncards.blogspot.com
Joni Andaya http://jonininaandaya.blogspot.com
Kristen Foreman http://kristenforemandesigns.blogspot.com
Amy Tsuruta http://tsurutadesigns.blogspot.com
You have until Friday evening to comment, winners will be announced on Saturday.
Thanks for coming by! Come back this afternoon when I'll be revealing my final Gallery Idol card!
Supplies Used
Paper/Cardstock: CTMH - White Daisy and Colonial White cardstock; PTI - True Black cardstock; MME - On the Bright Side 6x6 pad
Stamps: Neat & Tangled - On the Corner and On the Corner Additions
Ink: Versafine; Versamark
Other: Stampendous - White Detail Embossing Powder; American Crafts - This to That Round Foam Adhesive; Tombow - Mono Adhesive; May Arts - Black Burlap String; Corner Rounder
Sunday, June 15, 2014
Waffle Flower Challenge June/July 2014
I've been a bad blogger this past week, but you're rewarded today with not one, but TWO posts. I'm pretty excited about this one too. My sweet friend Nina Yang recently started her own company, Waffle Flower Crafts. She has started a challenge, and I'm lucky enough to be one of the Design Team members!
The challenge will run for two months and each month there is a sketch as well as a technique challenge. You can choose to create a card for either of those categories, or combine them. Enter as many times as you want. Here are this month's challenges:


I chose to use the sketch for my card and stayed quite true to it. I used softer colors, mixing gold and silver as well. The sentiment, bow and stars from the Bowtiful stamp set and the circles are from the Flower Circles set.

I used Delicata for the gold, Tsukineko Brilliance Silver for the silver, and stamped the sentiment with Verafine Smokey Grey.
I wanted to add some sequins, but I couldn't find them, which would not surprise anyone looking at my craft space, so I used a bit of that silver foil cardstock with a confetti punch instead.

I hope that you will play along with the challenge! I'll have another card to share next month. Here are all the pertinent details for you:
Pick a category or combine both to create a NEW project. Since this is our first challenge, we consider all projects using our products as NEW! We welcome all project types and crafters at all levels to join us.
To Enter:
Add your link(s) to the Link-up Tool on the Waffle Flower site. Remember to include a link to this post in your post (on your blog) or in the description of your photo (in an online gallery).
Here are the basic rules to play along:
- Use at least one of Waffle Flower Crafts products on each entry. List the product name in your blog post. If you use an online gallery (Flickr for example), list the name in the description. This is especially important when you used a product in a clever way that might not be obvious to people. Our team will be looking for them but please help make it easier for them.
- Enter as many times as you want. If you have a blog, please include the graphic of the category you are entering in and link to the challenge post. This is to help your readers and crafty friends to find us and join the fun!
- Combine up to 3 other challenges if you want. We look forward to seeing what wonderful projects you will create with your own unique formula.
Supplies UsedPaper/Cardstock: Avery Elle - Silver Fox, Cream, and White Cardstock; Recollections - Silver Foil YardstickStamps: Waffle Flower - Bowtiful, Flower CirclesInk: Versafine Smokey Grey; Delicata; Tsukineko - Silver BrillianceOther: Tombow - Mono Adhesive; CTMH - Dimensional Foam Tape
RCC94 - Dads Grills & Summer Fun

Hey everyone! Here to share my card for this month's Ribbon Carousel challenge.

I needed a good excuse to get another Father's Day card done, so went with the 'Dad' part of the challenge.
I think remotes are the ultimate Dad symbol, both my Dad and Andrew are frequently found in close proximity to the remote, so I prominently featured the remove from Jane's Doodles' It's a Guy Thing set. I stamped all but one in second generation.
The sentiment was created with Lawn Fawn's Milo's ABCs, and I finished the card off with various strips of washi tape.
I hope you will play along this month. A random will will win a 10 pack of spools, and all you have to do is link up a project over at the Ribbon Carousel blog based on this month theme which uses ribbon, twine, thread, washi, or anything that comes on a spool.
Supplies Used
Paper/Cardstock: Avery Elle - White cardstock
Stamps: Jane's Doodles' - It's a Guy Thing; Lawn Fawn - Milo's ABCs
Ink: CTMH - Black
Other: Various washi tapes; American Crafts - This and That Foam Adhesive
Monday, June 9, 2014
Gallery Idol Round 4 - Border Stamps

Can't believe that I've made it through to the semi-final round of Gallery Idol! Thanks so much for voting to keep me in for another week!
Another tough challenge this week....border stamps. Here's the thing about border stamps, I don't have very many and the ones I have I don't use very much, so I really wasn't sure what I was going to do. After puzzling for a while, I came up with my idea.....using border stamps as a guide for stitching.
I used one of the borders from WPlus9's Fair Isle Backgrounds to create the basic design/guide for the card. I stamped with a very light ink on Cream cardstock.
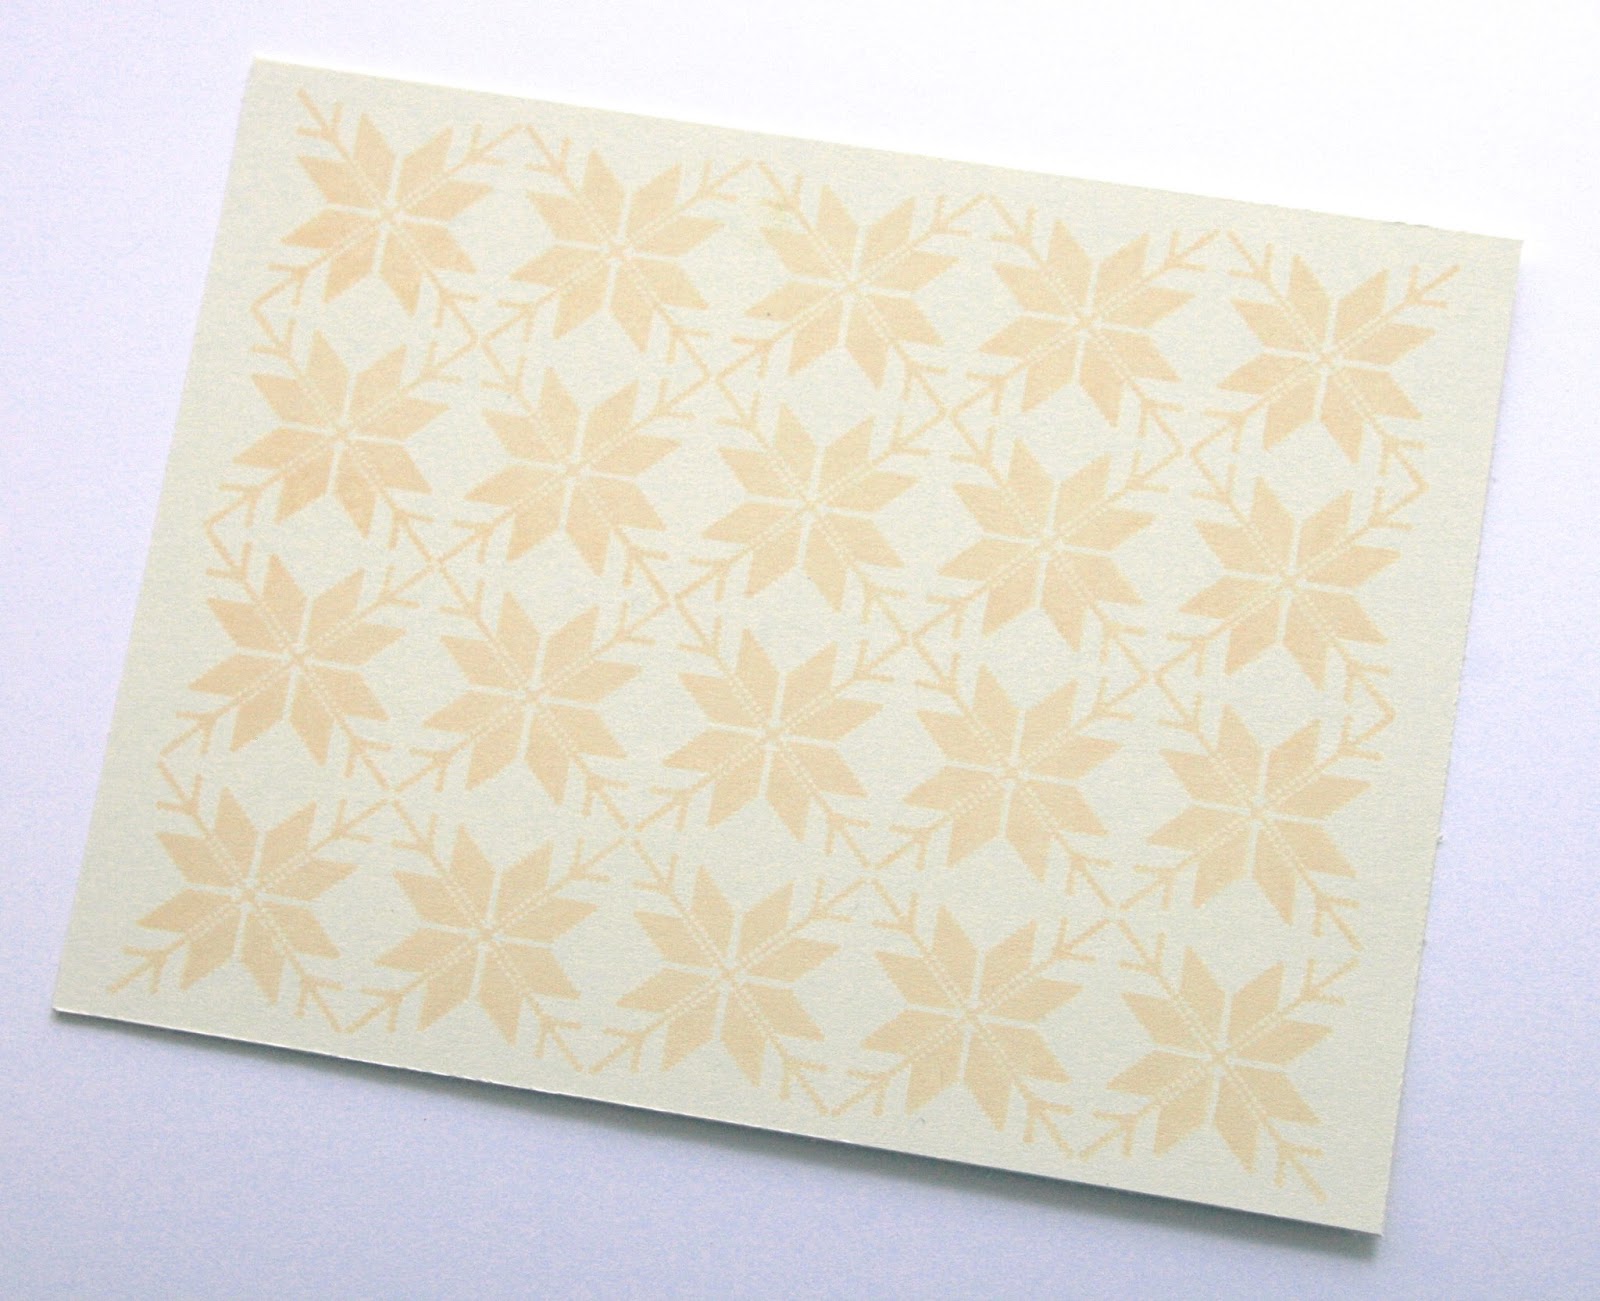
I went ahead and stamped the sentiment before all the stitching because I'm a notoriously bad stamper in that I make a lot of mistakes, I tend to leave a lot of smudges and fingerprints, and I didn't want to finish up the whole card and then screw up the sentiment.

Then I started stitching. I first used my needle to pierce the holes and then stitched using two strands of DMC floss.

This is not for the faint of heart. It's a lengthy process, but if it's something you want to try here are a few tips:
1) Use the thickest cardstock you can.
2) Use a needle with the smallest head possible....makes threading a bear, but it's easier on the cardstock and I hate seeing big ungainly holes in the cardstock.
3) Work from the inside of the card out. This technique is hard on your cardstock, at the same time, once the stitching is complete it actually adds strength/heft to it, so by starting towards the center of your panel where it's the most stable and working out you minimize your chances of bending/tearing.
4) Slow and steady wins the race - you don't want to bend the cardstock or accidentally tear a hole especially when you are stitching in close proximity to another hole or the edge of the cardstock.
5) Use a stamp press. As I mentioned, I'm not a great stamper technique-wise. I envy all who can effortlessly stamp in a straight line. I used a Fiskars stamp press to create this card and even so, needed a few tries to get my borders lined up correctly.

This technique can be as complicated or uncomplicated as you want. I created starbursts/flowers, but you could just follow the outlines exactly, or even add additional elements that are not part of the border, use more colors, etc.

I hope you love the card, and if you do, please head over to the Gallery Idol page and vote for me (Card #3), I'd love to have a chance to win it all!
Supplies Used
Paper/Cardstock: Avery Elle - White and Cream cardstock
Stamps: WPlus9 - Fair Isle Backgrounds; Avery Elle - Oh Happy Day
Ink: CTMH - Parchment; Versafine
Other: DMC Embroidery Floss; Fiskars - Stamp Press; American Crafts - This and That Round Foam Dimensional Adhesive
Subscribe to:
Posts (Atom)