Tuesday, March 31, 2015

You Mean the World To Me


Thought I would pull out this cool die from My Favorite Things the other day.  I really love the design of this, and the size means that there's really not a whole lot else you need to do with it.  It's almost an instant card!

The patterned paper is an old SC Abroad pattern, but I thought the circles were a perfect complement to the die.

I did want to add a little extra oomph to the earth, so I VERY roughly traced where the continents were on my green cardstock and added a bit of shading with a Copic marker.  This really was very approximate, I just wanted a little texture to the green, but didn't want to have to worry about lining things up perfectly.


For a pop of extra color I added a die cut heart to the sentiment too.

That's all for today, see you in April!

Supplies Used
Paper/Cardstock:  MFT - Natural, Kraft, Gumdrop Green, Wild Cherry, and Hot Fudge cardstock; SC - Abroad 6x6 paper pad
Other:  MFT - Die-namics Centerpieces You Mean the World To Me, Die-Namics Blueprints 23, Die-Namics LLD Coffee Cup; Copics; Scotch - Foam Adhesive; Tombow - Mono Adhesive

Monday, March 30, 2015

Piecing with Stencils Tutorial


I've used this technique before, but I thought I would share a tutorial today.

First using washi/masking tape, affix your stencil to the card base and using an ink dauber, apply ink to create the outline of the selected image.  You don't need to fully ink it, you really just need the outline so that you can adhere the pieced cassette.


In actuality, for a card like this you could skip this step, but if your image is more complicated, or you were going to show more than one cassette, this helps with placement.


For the remaining pieces, you'll want to use an extra fine Sharpie marker.  As before, place the stencil over your paper and use the Sharpie to color in the lines for the portion of the stencil you are piecing/cutting out.  To give you a clear idea of what this looks like, here is on white cardstock:


And this is what the individual patterned pieces look like prior to cutting them out.  Keep in mind that unlike above (where these are the last pieces which will be cut out), you need to trace around enough of the stencil so that you maintain the reference lines for the next item to be adhered.  So you can see on the orange piece to the left the outer line of the cassette as well as the inner lines where the green piece will fit.


 Once that's done, fussy cut the pieces.


And then adhere to create your finished piece:


Although a little labor intensive, it's a fun and easy technique and also adds some great dimension.


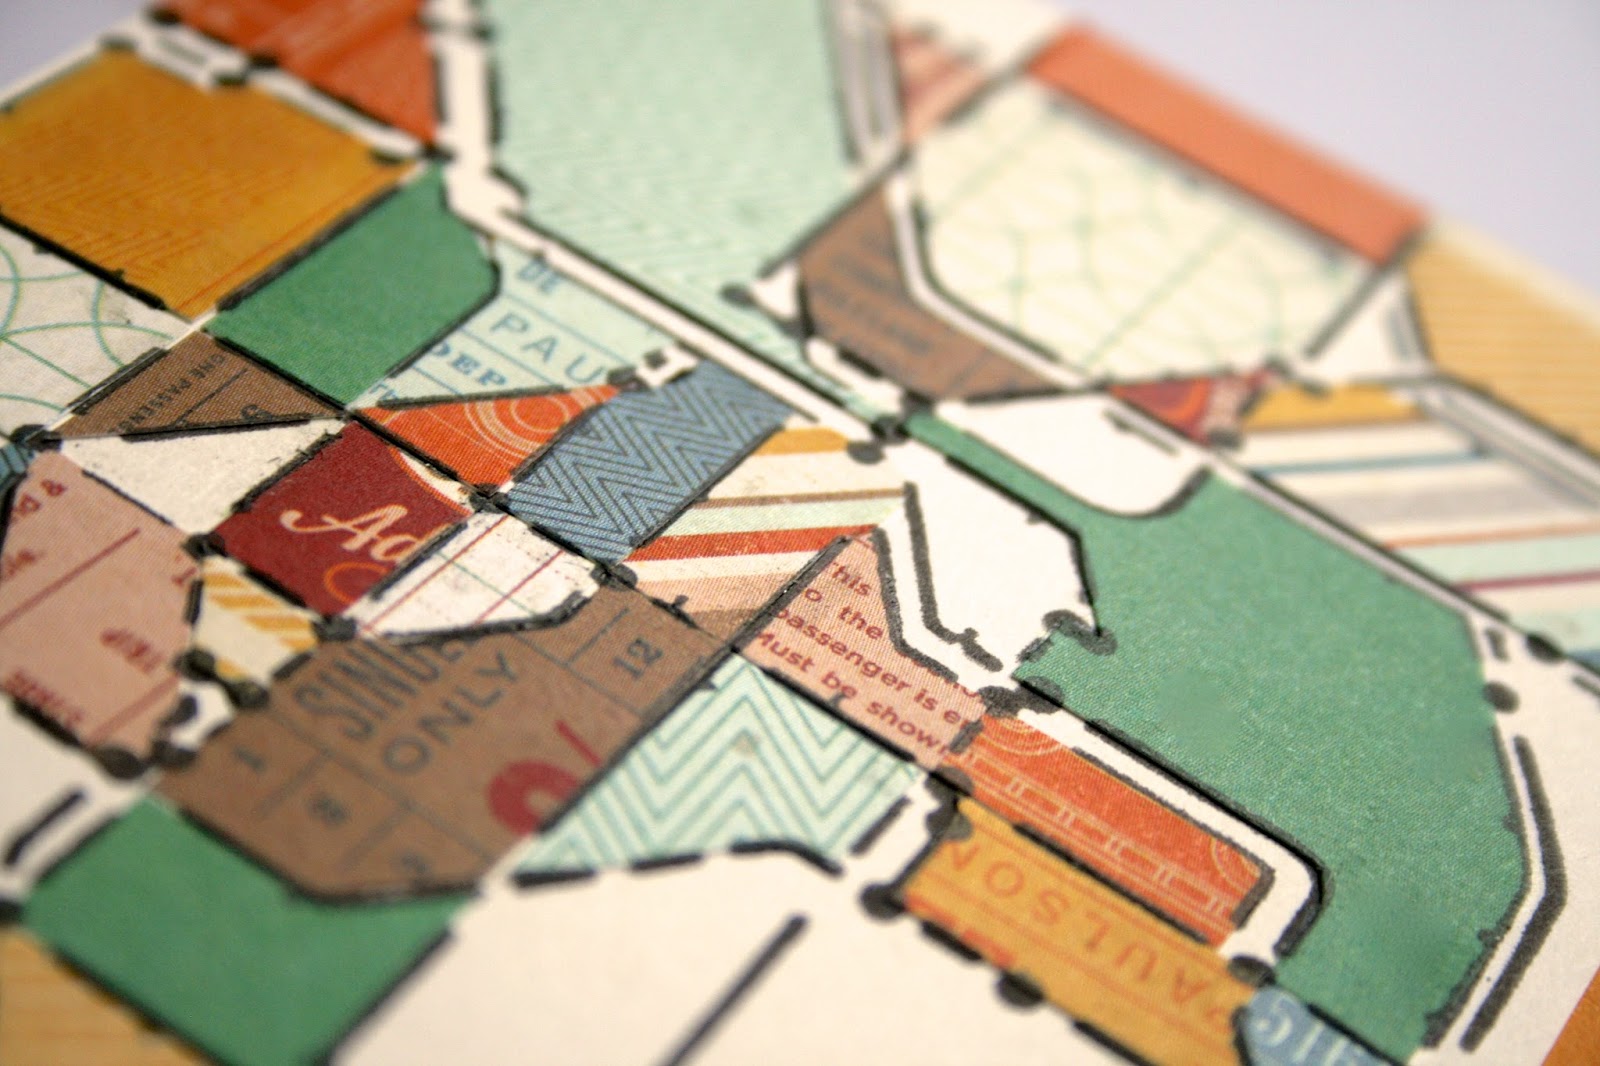
That was a pretty simple way to use the technique, with a focal point, but you can also use the technique on very complex and detailed designs, such as this card with The Crafter's Workshop subway stencil.


This one definitely took a long time, but the results are worth it.  Here's a close up view of the piecing.


Piecing isn't for everyone, but if you are a fan with your stamped images, I would encourage you to give it a try with your stencils.  I think you'll really love the results, and if you do try it, please let me know, I'd love to see!

Supplies Used
Paper/Cardstock:  Avery Elle - White and Cream cardstock; PTI - True Black Cardstock; Fancy Pants - True Black 6x6 pad; Basic Grey - Carte Postale 6x6 pad
Stamps:  Mama Elephant - Good Times, Wanderlust
Ink:  Memento - Tuxedo Black; CTMH - Black
Other:  The Crafter's Workshop - Mix Tape and Subway 6x6 stencils; Sharpie - Extra Fine Marker; Kuretake Glue Pen; Tombow - Mono Adhesive

Sunday, March 29, 2015

Congratulations - Altenew March Challenge


I've been meaning to play along with the Altenew challenge, but this is the first chance I've gotten.


I really loved the inspiration photo and knew I wanted to use the Persian Motifs stamp set with my Graduated Stripes cover plate.

Two of the large images from Persian Motifs were stamped and embossed using Egyptian Gold embossing powder on vellum and fussy cut.

I debated whether to use the natural or black cover plate die cut, and ended up going with both, slightly offset so you get just a hint of the black.  The stamped vellum pieces were tucked under the cover plate and then the whole piece was adhered to the card base.  I used some vellum adhesive to adhere a few portions of the stamped pieces, but I left plenty loose, I really like the dimension that they provide.


Then it was just a matter of stamping the sentiment and adding a smattering of sequins.

Hope you are having a great weekend!

Supplies Used
Paper/Cardstock:  MFT - Natural cardstock; Avery Elle - Cream cardstock; PTI - True Black cardstock; Recollections - Vellum
Stamps:  Altenew - Persian Motifs, Magnolias for Her
Ink:  Versafine and Versamark
Other:  Neat & Tangled - Graduated Stripes Cover Plate; Neat & Tangled - Gold and Black sequins; Judikins - Egyptian Gold Embossing Powder; Tombow - Mono and Vellum Adhesive; CTMH - Liquid Glass

Friday, March 27, 2015

Let it snow, let it snow, let it snow


Crazy but true, I have another layout to share!

These photos are from the girls' Frozen birthday part this summer.  This was the Insta-Snow activity which was a ton of fun, but didn't last that long since the kids (mine especially) quickly decided that actually making it snow was a lot of fun.  The stuff was all over the deck and the kids were 'ice skating' in it, but it proved a bit treacherous for the adults so we had to sweep it away.

I started with The Underground scrapbook kit from Studio Calico, using the a patterned paper from the base and then that blue cardstock.  It fits with the theme and pictures perfectly.  Added a large doily from my stash and then stamped and fussy cut some Lawn Fawn alphas.

The journaling is hidden under the center photo.


This is another layout for the Paper Issues online crop.  I love these types of events because they help get me jumpstarted and back into my scrapbooking.

I'm so excited it's Friday.  Next week is spring break and I'll work part of it and hang out with the girls/family for part of it.  Hope you have a great weekend!

Supplies Used
Paper/Cardstock:  American Crafts - Black Cardstock
Stamps:  Lawn Fawn - Quinn's ABCs
Ink:  Memento - Tuxedo Black
Other:  Studio Calico - The Underground Scrapbook Kit; American Crafts - Chap tab; Tombow - Mono Adhesive; Xyron - 1 1/2" Sticker Maker; Misc Doily from stash

Thursday, March 26, 2015

One more Stretch Your Dies card


Hey everyone, just popping in really quickly to share one more card for the Stretch Your Dies class.  I have several additional techniques that I want to try, but it's been such a crazy month, I haven't been able to do as many 'extra' projects as I'd like, plus I've been in the mood to scrapbook and I've learned that if that's the case I should try and get as many layouts done as possible before the mood departs!

Anyway, I really wanted to try this technique for small dies that my friend Jen Rzasa taught.  You create some water color washes on cardstock (I used Strathmore Mixed Media paper) and then die cut your small dies.  Then you adhere them to create a background/custom patterned paper.


I found this a really fun and relaxing technique.  I love the wash from the colors.  Jen's card for class was very bright and festive, mine is bit more soft and calming.  I love how you can use the same technique for vastly different looks/feels.

I used Ellen Hutson's Hearth & Home dies and the sentiment is from their Cozy Christmas set.

That's all for now, I'll have another layout to share with you tomorrow.

Supplies Used
Paper/Cardstock:  Avery Elle - Silver Fox, White, and Chocolate cardstock; Strathmore - Mixed Media Paper
Stamps:  Essentials by Ellen - Cozy Christmas
Ink:  Versafine Smokey Grey
Other:  Essentials by Ellen - Home and Hearth dies; Derwent - Inktense Pencils; CTMH - Clear Embossing Powder; Tombow - Mono and Multi Mono Adhesive; AC - Foam Adhesive

2014 in Books


Don't be shocked, but I have another layout to share!

I did a similar layout last year, but that was much more labor intensive since I did a little write-up for each of the books I read.  Given the fact that I read more books this year, I was looking for a simpler way to scrapbook the topic.

Anyway, as soon as I saw this sheet of paper from October Afternoon's Public Library collection last year I knew I was going to use it for this year's layout.


I trimmed down the sheet to create the card catalog for my layout.  I fussy cut some of the drawer fronts from the rest of the paper to use on the front of my fold out drawers.  Inside I listed the books that I read based on how I rated them.


I'm happy to report that I read more books this past year than the year before, and I got back into fiction too.

That's all for today, hope it's a good one!

Supplies Used
Paper/Cardstock:  October Afternoon - Public Library; collection; Fancy Pants - Swagger collection; CTMH - Colonial White Card-stock
Other:  Pebbles - Thickers; American Crafts - Amy Tangerine Translucent Letter Sticker, Black 03 Journaling Pen; Tombow - Mono Adhesive

MFT Color Challenge #18


It's time for another Color Challenge at MFT.

This month we're collaborating with SRM Stickers.


Here's a little sneak of my project.

Head over to the blog to check out the whole thing and see what the other girls made.

Wednesday, March 25, 2015

Guest Designing for Taylored Expressions - Week 3


Hey everyone!  It's my last week guest designing for Taylored Expressions.  Here's a little sneak of my card.

My last post is up over on the blog.  This is just a little sneak.  Head over to the TE blog to see the whole thing.

Thanks so much to the folks at TE for having me this month, I had a great time!

MFT Sketch 221


Last sketch of the month!

This time I challenged myself to go a little outside the box and create a one layer card.  Intrigued?  Here's a little sneak.


You'll have to go over to the challenge blog to see the whole thing as well as the rest of the DT projects.

Tuesday, March 24, 2015

Water Play


March has been such a busy month in terms of crafty commitments, but it's winding down, and I've been itching to get some scrapbooking done.  There's an online crop going on at Paper Issues, so it seemed like a great way to jumpstart my scrapbooking.

This is for the no cardstock challenge, which is pretty rare for me actually.  I almost never create without some cardstock.  I cheated a little as I used some 'patterns' that are more solids, but this is still pretty good for me.

These are some photos from this past summer when the cousins were in town and we took the kids to a little plaza area in front of a local movie theater.

The journaling cards are Simple Stories.  Short and sweet today.  Hope your week is going well!

Supplies Used
Paper/Cardstock:  BasicGrey - Spice Market, RSVP; Echo Park - Alison Kreft Love Script paper
Other:  Simple Stories - Say Cheese 4x6 SN@P cards, I Heart Summer 4x6 SN@P cards; American Crafts - 03 Black Journaling Pen, Black Chipboard Thickers

Monday, March 23, 2015

Stretch Your Dies - Masking Stamped Images


I've been taking the Stretch Your Dies class from Online Card Classes and was finally able to work on some of the techniques this weekend.

This card uses the masking technique taught by Dawn Woleslage.  She featured a few ways to execute the technique and I combined a couple.  I started with inking, using a couple shades of distress ink.  I wanted some more texture though, so I also used ink sprays.  Rather than misting the entire panel, I used two colors and splattered.  


While Dawn used black ink for all the stamped images, I wanted a more colorful/less graphic look, so I stamped some of the images in color and some in black.  I also added a bit of doodling to the centers sprays in the solid flowers.

The stamps are from Ellen Hutson, and the die is Studio Calico.

This was a pretty quick and easy technique that I'll definitely be trying again.

Supplies Used
Paper/Cardstock - My Favorite Things - Sweet Tooth; PTI - True Black
Stamps:  Ellen Hutson - Bold Blooms
Ink:  Hero Arts - Raspberry Jame & Fresh Peach; ; Ranger - Picked Raspberry & Scattered Straw Distress Ink; Versafine
Other:  Ranger - Funky Fuchsia & Cherry Pie; Heidi Swapp - Gold Glimmer Mist; Studio Calico - Hello By Lindsay Letters Die; Scotch - Foam Adhesive; Tombow - Mono Adhesive

Friday, March 20, 2015

Thank God For You for Jane's Doodles


Hey everyone,  I'm up on the Jane's Doodles blog today.

I just got Pretty Peonies in the mail, I've been wanting this set forever, so I just had to ink it up as soon as it came.

I stamped the flowers on some mixed media paper with Versafine and then proceeded to spritz them repeatedly with different Dylusions Ink Sprays.  One tip, I use a heat gun after misting each color to dry the paper so that the colors don't mix too much.  They'll still mix a little, but it won't get as muddy.

I also flicked spray on to get some of the larger droplets, I like the texture that it adds, and then finished it up with some Heidi Swapp Gold Color Shine.  I also used a gold gel pen to color in the centers of the flowers.


I kept the card itself pretty CAS. I wanted the focus to be on the flowers.  A simple white panel was stamped with a sentiment and then I added that thin strip of gold cardstock which I stitched down.

The flowers were fussy cut and adhered with foam adhesive.

I'm in love with these flowers....expect to see more!

Have a great weekend!

Supplies Used
Paper/Cardstock:  Avery Elle - White Cardstock; PTI - True Black Cardstock; Recollections - Gold Cardstock; Strathmore - Mixed Media Paper Pad
Stamps:  Jane's Doodle's - Pretty Peonies
Ink:  Versafine
Other:  Ranger - Dylusions Pure Sunshine, Squeezed Orange, Bubblegum Pink, Postbox Red, and Slate Gray Ink Sprays; Heidi Swapp - Gold Colorshine; Uniball - Gold Gel Pen; Tombow - Mono Adhesive; Scotch - Foam Adhesive; AC - Foam Adhesive

Wednesday, March 18, 2015

Guest Designing for Taylored Expressions - Week 2


Hey everyone!  My second post for the month is up over at the Taylored Expressions blog.  Today I'm focusing on a die that is usually a supporting character and making it the star, and I've got not one, but two cards to share.


Please head over and take a look.

MFT Sketch 220


Hey everyone, ready for a new sketch challenge?

I decided I needed to do a little something with my overwhelming collection of patterned papers this week.  Here's a little sneak:


Head on over to the blog to see the whole thing as well as the rest of the DT cards!

Tuesday, March 17, 2015

Grateful for You for SPARKS challenge


It's been awhile since I played along with the PS SPARKS challenge.  It's an Anything Goes week, and I decided to pull out my favorite set, Blossoming Buds.


I decided to piece, it's a great way to use up some of your stash/scraps.  There's a little bit of everything on this card:  Studio Calico, BasicGrey, October Afternoon, My Mind's Eye....

Hope that your week is off to a good start, we're enjoying some really gorgeous weather here!  Happy St. Patrick's Day!


Supplies Used
Paper/Cardstock:  Avery Elle - White Cardstock; Misc Patterned Papers
Stamps:  Paper Smooches - Blossoming Buds
Ink:  Memento - Tuxedo Black; Versafine
Other:  Kuretake - Glue Pen; Tombow - Mono Adhesive

Monday, March 16, 2015

My Favorites Things/PageMaps Mash Up


For the next few months, MFT and PageMaps are collaborating!  We'll have a bonus sketch each month for you to play along with, and of course there are prizes.

Here's a sneak peak at my take on the sketch.


Head over to the blog to see the whole thing and get the details!

Saturday, March 14, 2015

Winners!

Hey everyone, thanks so much for all your comments!  I'm here to announce the winners of my new release giveaways.

After consulting with random.org, the winner of Dala Horse is......

Tracey McNeely

and the winner of Scandinavian Flowers is......

Virginia Lu

Congrats ladies!  Shoot me your mailing addresses and I'll have these sent right out to you.

Didn't win, but still need some of the new goodies?  Don't wait!  Head over to the Neat & Tangled store, Dala Dies is already sold out, and I'm thinking the new cover plate will be next.....

Thanks to all again for your support!

Friday, March 13, 2015

Neat & Tangled Release Week - Day 5


Release day is here!  All of the new products are now available in the N&T shop, and today we're featuring another new set from May Park called The Giving Tree.


I love the tree stump image and wanted to make it the focal point of my card.

It's stamped with Memento and colored with Copics.  I chose a sentiment from Paper Cut Flowers and finished it off with some Lawn Trimmings twine.

Thanks so much for all your encouraging and kind comments this week.  It's always a little nerve wracking revealing new products, they are like your kids and you want everyone to love them as much as you do.

Don't forget to leave a comment here and on all my release week posts.  Tomorrow morning I'll be selecting one comment to win the Dala Horse stamp set and one comment to win Scandinavian Flowers.  If you can't wait (there's a good chance of sell out) and want to go ahead and place an order today, head over to the shop and if your name is drawn we'll refund the price of the set.

Thursday, March 12, 2015

MFT Color Challenge #17


Hey guys!  It's time for a new MFT color challenge.

This month we're collaborating with SRM Stickers for our color challenges.  We each received a great package of goodies from SRM to use for our projects.


Here's a little sneak peek at my project for today.  Head over to the blog to see the whole thing and check out what the rest of the team created.

Paper Crafter's Library Featured Artist


Hey guys!  I told you this was going to be a busy week here!

I'm the Featured Artist over at Paper Crafter's Library today.


I've got a couple cards featuring my new Dala Horse stamps/dies and Scandinavian Flowers.  Would love for you to head over there to check it out!

Neat & Tangled March Release Week - Day 4


Hey guys, ready for Day 4?

Today we're revealing a new set from May Park called Meowwwww.


I really like cartoony vibe of these cats, so I thought I would play that up in my card.

The images were stamped on watercolor paper and then used my Kuretake Gansai watercolors to create the scene.  I wanted to keep it black and white to emphasize the graphic nature of the images and also really make the little fish stand out.

I ended up using a sentiment pairing from Stop & Go because it was perfect for the scene.

Make sure you head over to the Neat & Tangled blog to see what the rest of the girls created and also to enter to win a set of your own.  And don't forget, at the end of the week, I'm going to pick two lucky comments who will each win one of my new stamp sets.

Supplies Used
Paper/Cardstock:  Canson - Watercolor Paper; PTI - True Black Cardstock
Stamps:  Neat & Tangled - Meowwww, Stop & Go
Ink:  Verafine
Other:  Kuretake - Gansai watercolors; Scotch - Foam Adhesive